Executive Summary
When your garbage disposal stops working, begin with the red reset button. Most issues are due to jams or minor electrical overloads that you can resolve safely.
Key Takeaways
- Reset first: Press red button to clear overload.
- Unjam safely: Use a hex key or wooden tool, never hands.
- Prevent damage: Avoid fibrous foods and fats.
- Know limits: Call a pro for electrical or severe mechanical failures.
1. Understanding Your Garbage Disposal
Your garbage disposal uses impeller arms and a shredder ring rather than blades. It spins at high speed to break down food waste. Understanding its components and common failure modes will help you diagnose problems quickly and accurately.
1.1 How It Works
- Impeller Arms: Force food against shredder ring, grinding particles into tiny fragments.
- Flywheel Speed: Approximately 1,800 rotations per minute to ensure efficient grinding.
- Shredder Ring: Fixed to housing; impellers push waste through narrow slots.
- Discharge Path: Ground waste mixes with water and flows through the P-trap into home plumbing.
1.2 Common Failure Modes
- Overloads: Thermal protector trips when motor overheats due to jam or prolonged use.
- Jams: Foreign objects or fibrous materials lock impellers in place.
- Electrical Faults: Tripped circuit breakers, faulty switches, or GFCI outlets.
- Wear & Tear: Bearings and impellers degrade over 10–15 years of use.
2. Immediate First Step: The Reset Button
The quickest way to resolve many disposal issues is by pressing the reset button. This internal overload protector cuts power to prevent motor damage under high load or heat.
2.1 Locate & Identify
The reset button is located on the underside of the disposal unit, often on the side or center of the bottom. It is typically small, square, and red.
2.2 Step-by-Step Reset Procedure
-
1
Turn Off Power: Switch off the disposal and unplug from the outlet.
-
2
Cool Down: Wait 5–10 minutes for the motor to reset internally.
-
3
Press Reset: Push the red button firmly until it clicks and stays engaged.
-
4
Test Disposal: Plug in, run cold water, and flip the switch.
3. Manual Unjamming Techniques
If resetting does not restore operation, the disposal may be jammed. Manual unjamming safely clears debris and frees the impellers.
3.1 Hex Key Method (Preferred)
This method utilizes the hex socket on the disposal’s underside. A ¼-inch Allen wrench provides leverage to spin the impeller and dislodge jams.
-
1
Disconnect Power: Turn off the switch and unplug.
-
2
Insert Wrench: Fit the Allen wrench into the central hex socket.
-
3
Twist Back & Forth: Apply firm pressure, turning until rotation is smooth.
-
4
Clear Debris: Use tongs or pliers—never your hands—to remove trapped items.
-
5
Restore Power & Test: Plug in, run water, and switch on.
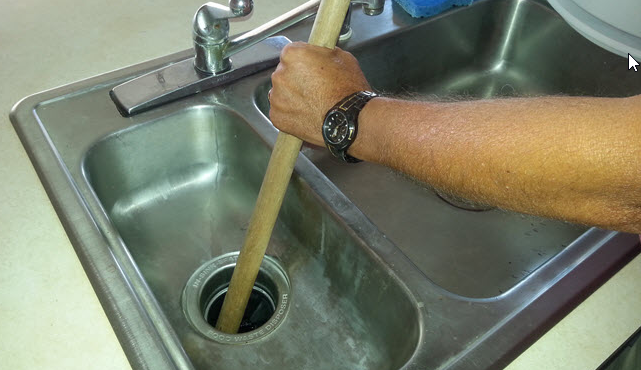
3.2 Alternative Above-Tool Method
If your model lacks a bottom socket, insert a wooden spoon or broom handle into the disposal’s opening. Manually rotate the impeller by applying pressure against vanes to break free jams.
4. Safety Warnings & Best Practices
Garbage disposals can cause serious injury if mishandled. Follow these safety guidelines and best practices to protect yourself and prolong unit life.
4.1 Forbidden Items
- Grease, Oils & Fats: Solidify and clog pipes.
- Potato Peels & Fibrous Produce: Create a starchy paste that jams impellers.
- Coffee Grounds & Eggshells: Form sludge and membrane wrap.
- Hard Bones & Fruit Pits: Can crack or damage impellers and rings.
- Non-Food Items: Plastics, metals, paper towels can cause serious jams.
4.2 Regular Maintenance Schedule
- Weekly: Run disposal with ice cubes to sharpen impellers; flush with cold water for 30 seconds.
- Monthly: Pour a paste of baking soda and vinegar, let sit, then rinse to remove buildup and odors.
- Annually: Inspect for leaks, loose mounts, and check reset button functionality; consider professional tune-up for units over 7 years old.
5. Troubleshooting: Humming vs. No Response
Failures fall into two categories: mechanical (jams) indicated by humming, and electrical (no power) indicated by silence. Each requires a distinct diagnostic approach.
5.1 Humming Without Grinding
If you hear a humming sound but no grinding, the motor is powered but the impellers are stuck. Immediately shut off power to avoid motor burnout and follow the unjamming procedures above.
5.2 No Power at All
Silent disposals suggest an electrical issue. Check the following in order:
- Ensure the unit is plugged in and the outlet is functional by testing with another appliance.
- Inspect and reset the circuit breaker or GFCI outlet.
- Press the red reset button after power checks.
- Test the wall switch for proper operation; replace if faulty.
- If unresolved, consult a licensed electrician to inspect wiring and motor integrity.
6. Cost-Benefit Analysis: Repair vs. Replacement
Understanding repair and replacement economics helps you decide whether to DIY, hire a plumber, or install a new unit.
| Expense | Repair Cost | Replacement Cost |
|---|---|---|
| Labor (Professional) | $75–$200 | $150–$300 |
| Unit | N/A | $100–$400 |
| DIY Tool Investment | <$20 (hex key) | $0–$50 (basic tools) |
Recommendation: Repair is cost-effective if your unit is under 7 years old and issues are identifiable. Replacement is wiser for older units with multiple failures.
7. Real-World Case Studies
7.1 Thanksgiving Jam
Scenario: Home processed 20 pounds of potato peels, disposal hummed and stopped.
Solution: Reset button after cooling; hex key unjam revealed starchy paste; tongs removed debris; function restored.
Lesson: Process starchy waste in small batches or compost to prevent overload.
7.2 Post-Power Outage Silence
Scenario: Disposal unresponsive after an outage; reset button intact.
Solution: Outlet test indicated tripped GFCI; reset restored power; no mechanical fault.
Lesson: Always check electrical basics before disassembly.
7.3 Persistent Hum Despite Free Spin
Scenario: Humming persisted after unjamming; hex key rotated freely.
Solution: Impeller damaged by prior metal tool abuse; professional replacement recommended.
Cost: $150 part vs. $300 new unit; opted for part replacement.
Lesson: Never use metal implements from above; prevention is key.
8. When to Call a Professional
While many fixes are DIY-friendly, certain conditions warrant professional expertise to avoid risk and additional damage.
- Visible water leaks from motor housing or seals
- Burning odors or smoke indicating electrical faults
- Repeated circuit breaker trips or fuse blowouts
- Unusual noises: squealing bearings, rattling loose parts
- Unit age over 10 years with multiple recurring issues
- Mounting instability or excessive vibration
9. FAQ
Q1: Why won’t my disposal turn on after pressing reset?
Ensure it’s plugged in securely, test the outlet with another device, reset the circuit breaker, and check the wall switch functionality.
Q2: Can I use dish soap to unclog a disposal?
Dish soap can help lubricate the chamber, but it won’t clear mechanical jams. Use manual tools or reset first.
Q3: How often should I run my disposal when idle?
Run cold water and disposal for at least 30 seconds weekly to prevent rust and remove residual debris.
Q4: Is it safe to grind small bones?
Small poultry bones occasionally help sharpen impellers, but large or dense bones risk motor strain and damage.
Conclusion
This comprehensive guide equips you to reset, unjam, and maintain your garbage disposal effectively. Prioritize safety, start with the reset button, use proper tools, and adhere to maintenance routines to extend the life of your unit. Know when to engage professional services for complex electrical or mechanical failures.
Last updated: September 01, 2025