Last Updated: April 23, 2025
Is your Samsung refrigerator displaying error codes or not cooling properly? The control board might be the culprit. This comprehensive guide walks you through replacing the DA41-00782B or DA92-00215X control board yourself, potentially saving hundreds on service calls.
Understanding Your Samsung Refrigerator Control Board
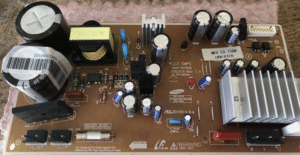
The control board is essentially the brain of your Samsung refrigerator. This critical component manages vital functions including temperature regulation, defrost cycles, and ice maker operations. When it fails, your entire refrigeration system can be compromised.
Most Samsung refrigerators use either the DA41-00782B (printed directly on the board) or DA92-00215X (found on the sticker label) control boards. These components are responsible for interpreting sensor data and controlling the various systems that keep your food fresh.
Before embarking on this repair journey, it’s crucial to confirm that the control board is indeed the problem. Let’s examine the common symptoms of control board failure.
Signs Your Control Board Needs Replacement
Cooling Problems
- Refrigerator compartment not cooling properly
- Freezer not maintaining proper temperature
- Inconsistent cooling throughout the appliance
- Compressor fails to turn on or runs constantly
Error Codes
- Display showing error codes like 23E, 83E, or 88
- Red LED blinking patterns
- ER-SN code appearing on the display
Interface Issues
- Unresponsive control panel or buttons
- Display flickering or completely dead
- Settings that reset unexpectedly
- Panel that lights up but doesn’t respond to commands
Important Cost Considerations
Replacing a Samsung refrigerator control board typically costs between $150-$300 for the part alone. Professional installation can add another $200 or more to your bill. By following this DIY guide, you can save significant money while addressing the problem in just 1-2 hours.
Tools & Materials Needed
Essential Tools
- Phillips screwdriver (multiple sizes recommended)
- Anti-static wrist strap (crucial to prevent damage)
- Needle-nose pliers (for disconnecting stubborn connectors)
- Multimeter (optional, for testing the board)
- Digital camera or smartphone (for documenting wire connections)
Required Parts
Exact part numbers:
- DA41-00782B (printed directly on the board)
- DA92-00215X (found on the sticker label)
Always confirm compatibility with your specific Samsung refrigerator model before purchasing. The part number printed on the board (e.g., 41-82B201303.27) is more important than the sticker label.
Recommended Suppliers
- RepairClinic
- Samsung Parts
- Authorized Samsung appliance parts dealers
Avoid generic or non-OEM boards unless specifically confirmed compatible with your model.
⚠️ SAFETY WARNING
Always unplug your refrigerator before beginning any repair work! Electrical components can retain charge even when unplugged, so wait at least 5 minutes after disconnecting power before starting work. This minimizes risk of electrical shock and protects sensitive components.
Step-by-Step Replacement Guide
1Preparation & Power Disconnection
Begin by completely disconnecting your refrigerator from power. Simply turning it off is not sufficient – you must physically unplug the power cord from the wall outlet. If your refrigerator has a water line connection, consider turning off the water supply as well, though this isn’t strictly necessary for control board replacement.
Next, carefully pull the refrigerator away from the wall to access the rear panel. Depending on your model, you may need to move the refrigerator completely away or just create enough space to work comfortably behind it. Have a helper assist if your refrigerator is particularly heavy or awkward to move.
Pro Tip: Place a towel under the refrigerator’s front feet when pulling it out to protect your flooring and make movement easier.
2Accessing the Control Board
Most Samsung refrigerator control boards are located behind the rear access panel. Using your Phillips screwdriver, remove the 4-5 screws securing this panel. Set these screws aside in a small container to prevent loss.
Once the panel is removed, you should see the main circuit board mounted to the rear wall of the refrigerator. In some models, you might need to remove additional components or plastic covers to fully access the control board.
This is an excellent time to put on your anti-static wrist strap and secure it properly. The strap should make contact with your skin and be grounded to prevent static discharge that could damage sensitive electronic components.
Location Note: In some Samsung models, particularly those with exterior displays, the control board may be located behind the front panel or inside the refrigerator compartment. Check your model’s service manual if you’re having trouble locating it.
3Documenting Wire Connections
Before disconnecting any wires, take clear photographs of the current wire arrangement. This step is absolutely crucial for proper reassembly. Multiple photos from different angles will provide the best reference.
If possible, label each connector with a small piece of tape and note where it connects. Pay particular attention to:
- Wire color and orientation
- Connector positions on the board
- Any unique or unusual connections
Caution: Some Samsung refrigerator models have nearly identical connectors that can easily be mixed up during reinstallation. Proper documentation now will save significant frustration later.
4Testing the Old Board (Optional)
If you have a multimeter and basic electrical knowledge, you can verify that the control board is indeed faulty before replacing it. Using your multimeter set to continuity mode, you can check for:
- Short circuits between power and ground connections
- Blown fuses on the board (if visible)
- Proper voltage at input connections
Look for any visible signs of damage such as burnt components, bulging capacitors, or corrosion on the board. These are clear indicators that replacement is necessary.
Advanced Testing: If you have electronics repair experience, you can test individual components on the board for failure. However, component-level repair is generally not cost-effective compared to full board replacement.
5Removing the Old Control Board
With your documentation complete, carefully disconnect all wire connectors from the board. Most connectors have a small tab that must be depressed before pulling them free. Never pull directly on the wires themselves, as this can damage both the wires and the connectors.
After all wires are disconnected, locate the mounting brackets or screws securing the board to the refrigerator. Depending on your model, the board might:
- Slide out of plastic retention clips
- Be secured with small Phillips screws
- Have snap-in tabs that need to be released
Once freed from its mounting, carefully slide the board out. Note any thermal pads or insulation that might be present, as these will need to be transferred to the new board.
Compare boards: Before proceeding, compare your old and new control boards to ensure they match. Check the actual printed board number rather than just the sticker number on the packaging.
6Installing the New Control Board
Handle the new control board by its edges to avoid transferring oils from your skin to sensitive components. Position it in the same orientation as the old board and secure it using the same mounting method.
Carefully reconnect all wire connectors to their proper positions, using your photos as a reference guide. Each connector should click into place securely. Double-check all connections to ensure they’re seated properly and that no connections were missed.
If your old board had any thermal pads, insulation, or heat-transfer materials, make sure to transfer these to the new board in the same positions. These components are essential for proper heat management.
Confirmation check: Before proceeding to reassembly, review your reference photos one more time to verify that all connections have been restored correctly and in the right orientation.
7Reassembly and Initial Testing
Replace the access panel and secure it with the original screws. Make sure all screws are properly tightened, but avoid over-tightening which could strip the threads or crack the plastic housing.
Carefully move the refrigerator back into position, leaving enough space to access the power outlet. Plug the refrigerator back in and listen for the startup sequence. You should hear the compressor turn on within a few minutes, though there might be a programmed delay.
Check the control panel for normal operation. If your model has a display, it should light up normally without error codes. If buttons were previously unresponsive, test them to ensure they now function correctly.
Initial observation period: Allow the refrigerator to run for at least 30 minutes while monitoring for proper cooling operation and any error codes that might appear.
Post-Installation Troubleshooting
If Problems Persist
Sometimes, even after replacing the control board, issues may persist. Here are some common problems and their solutions:
Refrigerator Still Not Cooling
- Verify all wire connections are secure and correctly placed
- Check if the evaporator fan is running
- Test the thermistor for proper resistance values
- Ensure the defrost heater and defrost thermostat are functioning
Error Codes Continue to Display
- Perform a power-cycle by unplugging the refrigerator for 5 minutes
- Check for associated component failures (sensors, fans, defrost system)
- Verify that the replacement board is compatible with your specific model
Display or Control Panel Issues
- Ensure the ribbon cable to the display panel is properly seated
- Check for water damage or condensation on the display components
- Test the display panel with a multimeter if possible
When to Call a Professional
If you’ve replaced the control board but still experience issues, it might be time to call a professional technician, especially if:
- Multiple components seem to be failing simultaneously
- You hear unusual noises from the compressor or sealed system
- There’s evidence of refrigerant leakage
- Complex error codes that indicate sealed system problems
Critical Precautions for Success
Preventing Static Damage
Electronic components are highly susceptible to damage from static electricity. Always wear an anti-static wrist strap properly grounded when handling the control board. If you don’t have an anti-static strap, regularly touch a grounded metal object before touching the board, and avoid working in areas prone to static buildup (like carpeted rooms).
Proper Handling Techniques
Always handle circuit boards by their edges to avoid transferring oils from your fingers to sensitive components. Never force connectors – if they don’t fit easily, double-check that you have the right connection. When removing wire harnesses, pull on the connector housing rather than the wires themselves to prevent damage.
Environmental Considerations
Work in a clean, well-lit environment with ample space. Keep liquids away from your work area, and avoid high-humidity conditions which can affect electronic components. After installation, allow the refrigerator to stabilize at room temperature before plugging it back in if it was moved from a cold garage or outdoor environment.
Frequently Asked Questions (FAQ)
Are DA41-00782B and DA92-00215X control boards interchangeable?
While these part numbers often refer to the same basic control board, the critical factor is matching the printed part number on the board itself (e.g., 41-82B201303.27) rather than the sticker label. Newer revisions are generally compatible with older models, but it’s essential to verify compatibility with your specific Samsung refrigerator model before purchasing. When in doubt, consult with a parts specialist using your refrigerator’s complete model number.
Will replacing the control board reset my settings?
Yes, installing a new control board will reset all programmed settings to factory defaults. After installation, you’ll need to reprogram your preferred temperature settings and any other customized functions. Some Samsung models might also require recalibration of the temperature sensors, which typically happens automatically during the first 24 hours of operation. Keep your user manual handy for reference during this reconfiguration process.
Can I use a generic or aftermarket control board?
While aftermarket boards are available at lower prices, they often lack the quality and reliability of genuine Samsung parts. Generic boards may work initially but frequently fail prematurely or cause intermittent issues that are difficult to diagnose. For critical components like the main control board, investing in a genuine Samsung replacement part is strongly recommended. The long-term reliability justifies the additional cost, especially considering the value of the food stored in your refrigerator.
How can I confirm the control board is actually faulty?
The most reliable indicators of control board failure include specific error codes (particularly 23e, 83e, or ER-SN), completely unresponsive displays, or erratic temperature control despite properly functioning sensors and compressor. You can use a multimeter to check for proper voltage to the board and appropriate output signals. Look for visible damage like burnt components or bulging capacitors. If you’ve verified that fans, sensors, and compressors are receiving power but not functioning properly, the control board is likely the culprit.
Conclusion
Replacing a Samsung refrigerator control board is a manageable DIY project that can save you hundreds of dollars in service calls. By following this comprehensive guide, you can confidently diagnose, remove, and replace the DA41-00782B or DA92-00215X control board in your Samsung refrigerator.
Remember that proper preparation, careful handling of electronic components, and meticulous attention to wire connections are the keys to successful repair. Always use genuine Samsung replacement parts when possible for maximum reliability and longevity.
With your new control board installed, your Samsung refrigerator should return to normal operation, properly maintaining temperatures and running all systems efficiently. The time invested in this repair not only saves money but provides valuable appliance maintenance experience for future projects.
Check us out for more at OneSourceApplianceParts.com