The Complete Guide to Accurate Oven Temperature Control
Is Your Oven Temperature Wrong? How to Test and Calibrate It
⚠️ Critical Issue Alert
Research shows that 80% of home ovens exhibit temperature inaccuracies of 25-50°F, with some deviating up to 75°F from their set point. This comprehensive guide provides professional-level solutions for testing, diagnosing, and correcting these critical temperature discrepancies that can ruin your cooking results.
Understanding Oven Temperature Inaccuracy
The Scale of the Problem
Temperature inaccuracy in home ovens is surprisingly widespread. Approximately 80% of home ovens exhibit some degree of temperature variance beyond acceptable limits. Most ovens are off their set point by about 25-50°F, which can dramatically impact cooking results. When your oven is set to 325°F but actually running at 360°F, recipes requiring precise temperature control will consistently fail.
Normal vs. Problematic Temperature Variations
It’s crucial to understand that some temperature fluctuation is normal during oven operation. Temperature swings of approximately 25°F are typical during the preheating cycle as heating elements cycle on and off. However, when the average temperature consistently differs from the set point by more than 15-35°F, calibration becomes necessary.
Testing Your Oven’s Actual Temperature
Using a Standalone Oven Thermometer
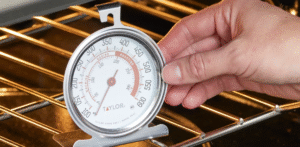
The most reliable method for testing oven temperature accuracy involves using a high-quality standalone oven thermometer. This simple yet effective tool provides real-time temperature readings independent of your oven’s internal sensors.
Step-by-Step Testing Process:
- Thermometer Selection: Choose a reliable oven thermometer with clear markings and proven accuracy. Dial thermometers are generally more durable than digital versions in high-heat environments.
- Placement: Position the thermometer in the center of the middle rack, ensuring it’s not touching oven walls or racks, which can conduct heat and provide false readings.
- Preheating: Set your oven to 350°F and allow it to complete its full preheat cycle. The preheat indicator signals when the oven believes it has reached the set temperature.
- Stabilization Period: After preheating completes, wait an additional 15-20 minutes for temperature stabilization. This accounts for thermal mass and ensures accurate readings.
- Reading Through the Door: Check the thermometer reading through the oven door window using interior light. Opening the door releases heat and can cause temperature drops of 25-50°F.
- Multiple Readings: Take readings at different temperature settings (300°F, 350°F, 400°F, 450°F) to determine if variance is consistent across the temperature range.
Professional Testing Techniques
For comprehensive testing, professional technicians use multiple thermometers placed in different oven zones to map temperature distribution. This method reveals hot and cold spots while confirming overall temperature accuracy. Place three thermometers at different rack positions and compare readings after a 30-minute stabilization period.
Digital Oven Calibration Procedures
Accessing Calibration Mode on Common Digital Control Boards
Modern digital ovens typically include built-in calibration functions accessible through specific button sequences. These procedures vary by manufacturer but follow similar principles.
General Digital Calibration Process:
- Enter Calibration Mode: Most digital ovens require specific button combinations held simultaneously for 3-5 seconds. Common sequences include holding “Bake” and “Broil” buttons together, or pressing “Settings” followed by holding “Up” and “Down” arrows.
- Navigation: Once in calibration mode, the display typically shows “CAL” or “0°F,” indicating successful entry.
- Correction Input: Enter the temperature offset as a positive or negative value. If your oven runs 25°F hot, input “-25” to compensate. The adjustment range is typically limited to ±35°F.
- Confirmation: Press “Start,” “Enter,” or the “Bake” button to save the calibration.
Brand-Specific Calibration Methods
Whirlpool/KitchenAid Models:
- Press and hold “Settings/Options” until “UPO” appears
- Use arrow keys to adjust temperature
- Press “Start” to save
GE Models:
- Hold “Bake” and “Broil Hi/Lo” for 2-3 seconds
- Display shows two-digit number
- Press “Bake” once to increase, twice to decrease temperature
- Use number pads to input specific adjustments
Samsung Models:
- Press “Settings” button
- Navigate to “Oven Calibration”
- Adjust using plus/minus buttons
Verification Testing
After digital calibration, conduct verification tests using the standalone thermometer method. Test at multiple temperatures to ensure the calibration correction applies consistently across the entire temperature range. Some ovens may require fine-tuning adjustments.
Mechanical Oven Calibration
Adjusting Thermostat Calibration Screws
Older mechanical ovens use analog thermostats with physical calibration screws requiring manual adjustment. This process requires careful attention and small incremental changes.
Locating the Calibration Screw:
The thermostat calibration screw is typically located behind the temperature control knob. Remove the control knob by pulling it straight off the shaft, revealing the calibration screw beneath or adjacent to the shaft.
Adjustment Procedure:
- Initial Position: Note the current screw position before making adjustments. Mark this position with tape or a permanent marker as a reference point.
- Testing First: Test the current oven temperature using the thermometer method to determine the degree of adjustment needed.
- Small Increments: Turn the calibration screw in very small increments—typically 1/8 to 1/4 turns at a time. Clockwise rotation generally increases temperature, while counterclockwise decreases it.
- Testing Between Adjustments: After each adjustment, reassemble the control knob and test the temperature again. Allow full preheating and stabilization time between tests.
- Iteration Process: Repeat the adjustment and testing process until the oven temperature matches the control setting within acceptable limits.
⚠️ Safety Considerations:
Always disconnect power to the oven before accessing internal components. Gas ovens require additional safety precautions—shut off the gas supply at the appliance shutoff valve and ensure adequate ventilation during the adjustment process.
Temperature Sensor Diagnosis and Testing
Understanding the Temperature Sensor
The oven temperature sensor, appearing as a protruding metal tube typically located in the upper rear of the oven cavity, plays a crucial role in temperature regulation. This component measures internal oven temperature and communicates with the control board to cycle heating elements appropriately.
Testing Sensor Resistance
A faulty temperature sensor often causes erratic temperature control, error codes, or complete heating failure. Testing sensor resistance provides definitive diagnosis.
Resistance Testing Procedure:
- Safety First: Disconnect power to the oven and allow it to cool completely to room temperature.
- Sensor Access: Remove the sensor by unscrewing the mounting bracket inside the oven and disconnecting the wiring harness behind the oven.
- Multimeter Setup: Set a digital multimeter to the resistance (ohms) setting.
- Testing: Connect the multimeter probes to the sensor terminals. At room temperature (approximately 70°F), most oven sensors should read near 1,080 ohms.
- Evaluation: Resistance readings outside the range of 970-1,190 ohms (±10% of 1,080 ohms) indicate sensor failure requiring replacement.
Common Sensor Failure Symptoms
- Inconsistent oven temperatures despite proper calibration
- Error codes (F1, F2, F3, F4, F10, F30, or F31 on various models)
- Oven not heating at all
- Temperature display showing impossible readings
- Excessive preheating times or never reaching set temperature
Understanding Normal Temperature Fluctuations
Acceptable Temperature Swings During Operation
Modern ovens use cycling heating elements to maintain set temperatures, resulting in normal temperature fluctuations of approximately 25°F above and below the set point. These swings occur as heating elements turn on and off to maintain temperature. During preheating, temperature swings may be more pronounced as the oven rapidly heats toward the target temperature. Once stabilized, well-functioning ovens maintain temperatures within 15-20°F of the set point most of the time.
Factors Affecting Temperature Stability
Several factors influence oven temperature stability:
- Thermal Mass: Ovens with greater thermal mass (heavier construction, stone or ceramic interiors) maintain more stable temperatures due to heat retention properties.
- Insulation Quality: Better insulated ovens require less frequent heating element cycling, resulting in more stable temperatures.
- Door Seal Condition: Worn or damaged door seals allow heat escape, causing more frequent heating cycles and greater temperature fluctuations.
- Rack Position: Different rack positions experience slight temperature variations due to heat circulation patterns and proximity to heating elements.
Advanced Diagnostics and Professional Solutions
When to Call Professional Service
Certain oven temperature issues require professional diagnosis and repair:
- Temperature sensor resistance testing reveals values outside acceptable ranges
- Digital calibration procedures fail to correct temperature discrepancies
- Error codes persist after calibration attempts
- Gas oven safety systems malfunction
- Control board failures affecting temperature regulation
Professional technicians have specialized equipment including calibrated temperature measurement devices, gas pressure testing tools, and component testing equipment not available to consumers.
Control Board Replacement Considerations
Modern oven control boards manage multiple functions including temperature regulation, timing, and safety systems. When control boards fail, temperature accuracy often suffers. Signs of control board failure include inability to enter or save calibration settings, erratic temperature readings, multiple system failures, and intermittent operation.
Preventive Maintenance for Temperature Accuracy
Regular Maintenance Schedule
Maintaining oven temperature accuracy requires ongoing attention:
- Monthly: Test temperature accuracy using standalone thermometer at common cooking temperatures
- Quarterly: Clean oven interior thoroughly, including temperature sensor area, to prevent grease buildup affecting sensor operation
- Semi-Annually: Inspect door seals for wear or damage and clean thoroughly to ensure proper sealing
- Annually: Professional calibration check and comprehensive system evaluation, especially for heavily used ovens
Environmental Factors
Kitchen environmental conditions affect oven performance:
- Altitude: Higher altitudes require temperature and timing adjustments due to lower atmospheric pressure
- Ambient Temperature: Extreme kitchen temperatures affect oven preheating times and temperature stability
- Voltage Variations: Electrical supply variations can affect heating element performance in electric ovens
- Gas Pressure: For gas ovens, supply pressure variations affect heating performance and temperature accuracy
📋 Professional Summary
Oven temperature inaccuracy affects cooking results more than most home cooks realize. Regular testing using standalone thermometers, proper calibration techniques, and understanding normal temperature variations ensure consistent cooking performance.
Key takeaways for maintaining oven temperature accuracy:
- Test temperature accuracy monthly using quality standalone thermometers
- Learn your specific oven model’s calibration procedures and apply corrections as needed
- Understand that 25°F temperature swings during preheating are normal
- Monitor temperature sensor condition and replace when resistance values exceed acceptable ranges
- Consider professional service for complex issues or when basic calibration fails
By implementing these testing and calibration procedures, home cooks can achieve professional-level temperature accuracy, ensuring consistent results for everything from delicate pastries to perfectly roasted meats. Regular maintenance and monitoring prevent minor temperature discrepancies from becoming major cooking problems.
📞 Frequently Asked Questions
Q: How often should I test my oven’s temperature accuracy?
Test your oven’s temperature accuracy monthly using a standalone oven thermometer. Place the thermometer in the center of the middle rack, set the oven to 350°F, and allow 20-30 minutes for stabilization before reading. This regular testing helps identify temperature drift before it significantly affects cooking results.
Q: What temperature difference requires oven calibration?
If your oven thermometer shows a reading that is above or below the set temperature by 15 degrees or more, you need to calibrate your oven. Small variations of 10-15 degrees are typically acceptable, but larger discrepancies will significantly impact cooking and baking results.
Q: Can I test my oven temperature sensor myself?
Yes, you can test your temperature sensor using a multimeter. At room temperature, the sensor should read approximately 1,080 ohms. Disconnect power to the oven, locate the sensor in the oven cavity, disconnect its wiring harness, and test resistance across the sensor terminals. Readings outside 970-1,190 ohms indicate sensor failure.
Q: Why does my oven temperature fluctuate during cooking?
Temperature swings of approximately 25°F above and below the set point are normal as heating elements cycle on and off to maintain temperature. This cycling is how ovens regulate temperature, similar to how a home thermostat works. However, if fluctuations exceed 35°F or the average temperature differs significantly from the set point, calibration may be needed.
For professional appliance parts and expert repair solutions, check us out for more at OneSourceApplianceParts.com
Last Updated: September 7, 2025 | Professional Content Verified