Last Updated: April 21, 2025
Is your HVAC system or industrial equipment failing to start? The culprit might be a faulty C22 2NO 190 capacitor. This comprehensive guide will walk you through everything you need to know about identifying, safely replacing, and troubleshooting this critical component without breaking the bank.
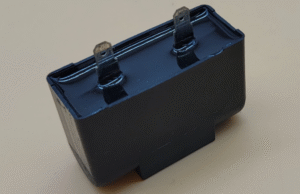
What Is a C22 2NO 190 Capacitor and Why Does It Matter?
The C22 2NO 190 capacitor (specifically the 5SP14R302TFM model) is a specialized shunt power capacitor designed for AC power systems up to 46 kV. These high-performance components play a crucial role in:
- Storing electrical energy to stabilize voltage fluctuations
- Improving power factor in electrical systems
- Providing the initial boost needed to start motors in various appliances
You’ll commonly find these capacitors in:
- HVAC units (both outdoor condensers and indoor air handlers)
- Industrial motors and compressors
- Commercial equipment requiring power factor correction
Signs Your C22 2NO 190 Capacitor Has Failed
Before you start replacing anything, it’s important to confirm that your capacitor is indeed the problem. Here are the telltale symptoms of a failing C22 2NO 190 capacitor:
- Equipment won’t start: Your appliance might make a humming noise but fails to activate
- Frequent circuit breaker trips: The system trips breakers or blows fuses repeatedly
- Unusual odors: A burnt smell emanating from your equipment
- Visual damage: Bulging, leaking, or visible corrosion on the capacitor itself
If you’re experiencing two or more of these symptoms, there’s a high probability your C22 2NO 190 capacitor needs replacement.
CRITICAL SAFETY WARNING
Capacitors store lethal amounts of electrical energy even after the power is disconnected! Always follow proper safety procedures when handling these components.
Essential Safety Precautions Before Replacement
Your safety comes first. Before touching any capacitor, follow these critical steps:
Required Safety Gear:
- Insulated rubber gloves rated for electrical work
- Safety goggles to protect your eyes
- Insulated tools with rubber handles
How to Properly Discharge a Capacitor:
- 1 Turn off all power to the unit at the circuit breaker, not just at the unit switch
- 2 Verify power is off using a multimeter set to AC voltage
- 3 Use an insulated screwdriver to short the capacitor terminals:
- For dual capacitors: Bridge C (Common) to HERM (compressor)
- Then bridge C (Common) to FAN
- 4 Confirm discharge with a multimeter set to DC voltage (should read 0V)
Remember: Never assume a capacitor is discharged just because the equipment has been unplugged. Always verify with a multimeter.
Tools and Materials Checklist
Required Tools:
- Insulated screwdriver (flathead and Phillips)
- Digital multimeter with capacitance testing capability
- Needle-nose pliers with insulated handles
- Wire cutters/strippers (if needed)
- Socket set or nut drivers (for mounting brackets)
Materials Needed:
- Replacement C22 2NO 190 capacitor (matching specifications)
- Electrical tape for insulation
- Wire nuts (if replacing terminals)
- Cable ties for secure mounting
- Camera or smartphone (to photograph original wiring)
Step-by-Step C22 2NO 190 Capacitor Replacement Guide
Step 1: Power Off and Locate the Capacitor
- 1 Disconnect all power to the unit at the circuit breaker box
- 2 Remove the access panel (typically secured with screws)
- 3 Locate the capacitor (usually cylindrical, often near the motor/compressor)
Step 2: Discharge the Capacitor Safely
- 1 Put on your safety gear (insulated gloves and goggles)
- 2 Use an insulated screwdriver to short the terminals
- 3 Bridge C (Common) to HERM (compressor) terminals
- 4 Bridge C (Common) to FAN terminals
- 5 Verify discharge with a multimeter (should read 0V DC)
Step 3: Document and Remove the Old Capacitor
- 1 Take clear photos of the wiring configuration (crucial for reassembly)
- 2 Label each wire (C, HERM, FAN) with tape or tags
- 3 Carefully disconnect wires using needle-nose pliers
- 4 Unscrew mounting brackets or straps holding the capacitor
- 5 Remove the old capacitor carefully
Step 4: Install the New C22 2NO 190 Capacitor
- 1 Verify the new capacitor matches specifications (µF rating and voltage)
- 2 Place the new capacitor in the same position as the old one
- 3 Secure it using the mounting bracket or strap
- 4 Reconnect wires to the matching terminals (use your photos as reference)
- 5 Ensure all connections are tight and secure
Step 5: Test and Finalize
- 1 Double-check all connections and mounting security
- 2 Replace the access panel
- 3 Restore power at the circuit breaker
- 4 Turn on the equipment and observe operation
- 5 Listen for any unusual noises or observe abnormal operation
Troubleshooting After C22 2NO 190 Capacitor Replacement
Even after proper replacement, you might encounter some issues. Here’s how to address common post-replacement problems:
Equipment Still Won’t Start
If your equipment still refuses to start after capacitor replacement:
- Double-check terminal connections for proper placement
- Verify the capacitor specifications match your equipment requirements
- Test the motor with a multimeter for continuity
- Check for wiring damage elsewhere in the system
Circuit Breaker Continues to Trip
If your circuit breaker keeps tripping after replacement:
- Check for short circuits in the wiring with a multimeter
- Inspect for damaged insulation on nearby wires
- Verify the capacitor voltage rating is correct
- Consider consulting a professional if problems persist
Compatibility and Alternative Options
When selecting a replacement for your C22 2NO 190 capacitor, keep these compatibility considerations in mind:
What to Match Exactly:
- Microfarad (µF) Rating: Must be within ±5% of original (e.g., 45±5 µF)
- Type: Run capacitor vs. start capacitor (these are not interchangeable)
- Terminal Configuration: Must match the original layout
What Can Be Flexible:
- Voltage Rating: Can use equal or higher voltage (never lower)
- Physical Size: Slightly different dimensions are acceptable if it fits
- Brand: Any reputable manufacturer is acceptable
Pro Tip: Always record the exact specifications of your original capacitor before ordering a replacement. The wrong capacitor can lead to equipment damage or fire hazards.
When to Call a Professional
While replacing a C22 2NO 190 capacitor is often a DIY-friendly repair, some situations call for professional help:
Call a Professional When:
- You observe extensive corrosion or damage to terminals
- The system has damaged wiring beyond the capacitor
- You’re working with high-voltage systems (above 240V)
- Multiple components appear damaged
- You lack the proper tools or safety equipment
- You’re uncomfortable working with electrical components
Safety First: If you’re uncertain about any aspect of the replacement process, it’s better to call a licensed technician. The cost of service is far less than the risk of injury or equipment damage.
Cost Analysis: DIY vs. Professional Replacement
DIY Replacement Costs:
- Capacitor: $15-$30
- Basic tools (if needed): $20-$50
- Safety equipment: $10-$25
- Total DIY Cost: $15-$105
- Time investment: 30-60 minutes
Professional Service Costs:
- Diagnostic fee: $75-$150
- Capacitor (marked up): $50-$100
- Labor: $75-$150
- Total Professional Cost: $150-$300+
- Time savings: Just the appointment time
Potential Savings: The average DIY replacement saves $135-$195, making it one of the most cost-effective home repairs you can perform!
Maintenance Tips to Extend C22 2NO 190 Capacitor Life
Proper maintenance can significantly extend the life of your new capacitor:
Regular Maintenance Schedule:
- Monthly: Check for unusual noises or operation in your equipment
- Quarterly: Clean dust and debris around the unit’s exterior
- Bi-annually: Inspect the unit’s ventilation for blockages
- Annually: Professionally clean the system and check capacitor visually
Environmental Considerations:
- Shield outdoor units from direct sunlight when possible
- Ensure proper ventilation around equipment
- Consider a surge protector for equipment in areas with unstable power
- Keep ambient temperature within manufacturer specifications
Frequently Asked Questions About C22 2NO 190 Capacitor Replacement
Can I use a capacitor with a higher microfarad (µF) rating?
No, you should not. Using a capacitor with a higher µF rating than specified can damage your motor by supplying too much starting torque. Always stick to within ±5% of the original specifications.
How long do C22 2NO 190 capacitors typically last?
These capacitors generally last 5-10 years, depending on usage patterns, ambient temperature, and power quality. Regular maintenance can extend this lifespan considerably.
Is it safe to use a capacitor with a higher voltage rating?
Yes, using a capacitor with a higher voltage rating is acceptable and sometimes preferable. However, avoid exceeding double the original voltage rating as it might affect performance.
Can I test a capacitor without a multimeter?
No, reliable capacitor testing requires a multimeter with capacitance measuring capability. Visual inspection can indicate obvious failures, but a multimeter is essential for accurate diagnosis.
Should I replace both capacitors if I have a dual-run system?
Yes, it’s generally recommended to replace both capacitors in a dual-run system simultaneously, even if only one has failed. This ensures balanced performance and reduces the likelihood of future downtime.
Conclusion: Taking Control of Your C22 2NO 190 Capacitor Replacement
Replacing a C22 2NO 190 capacitor doesn’t have to be intimidating or expensive. With proper safety precautions, the right tools, and this comprehensive guide, you can successfully tackle this repair and save hundreds of dollars in service calls.
Remember that safety always comes first when working with electrical components. Discharge capacitors properly, use insulated tools, and don’t hesitate to call a professional if you encounter complications beyond your comfort level.
Regular maintenance and timely replacement of failing capacitors will extend the life of your expensive equipment and ensure it operates at peak efficiency. By mastering this repair, you’ve added a valuable skill to your DIY toolkit.
Check us out for more at OneSourceApplianceParts.com