Last Updated: April 24, 2025
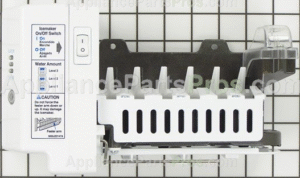
Is your LG refrigerator not making ice? You might need to replace the ice maker and auger motor assembly (part number 4681JA1006D, AEQ36756901, or SA12810-3850JZ2147A). This comprehensive DIY guide walks you through the entire replacement process, saving you hundreds in repair costs while restoring your ice-making functionality.
Understanding Your LG Ice Maker Assembly
The ice maker and auger motor assembly in your LG refrigerator serve two critical functions: producing ice cubes and dispensing them through the door. When this system fails, it can be frustrating to lose the convenience of readily available ice. The good news is that replacing this assembly is a straightforward DIY project that can save you significant money compared to professional repairs.
Common Symptoms of Ice Maker Failure
No Ice Production
Your refrigerator stops making ice completely despite having proper water supply and temperature settings.
Grinding Noises
Unusual sounds coming from the ice dispenser area, indicating potential motor or mechanical issues.
Error Codes
Display showing “ICE” or “CF” error codes, which directly relate to ice maker functionality problems.
Compatible LG Models
This guide applies to many LG French door refrigerator models in the LFXS and LSXS series. The part numbers 4681JA1006D, AEQ36756901, and SA12810-3850JZ2147A are interchangeable for these models.
Tools & Materials Needed
Required Tools
- ✅ Phillips screwdriver
- ✅ Flathead screwdriver
- ✅ Towel or bucket (to catch water)
- ✅ Clean cloth (for cleaning)
Replacement Parts
OEM Part Numbers:
- 🔹 4681JA1006D (Primary part number)
- 🔹 AEQ36756901 (Alternative part number)
- 🔹 SA12810-3850JZ2147A (Alternative part number)
Where to Purchase
For optimal performance and compatibility, we recommend purchasing genuine LG OEM parts from these trusted sources:
- LG Parts Direct (official LG parts distributor)
- Repair Clinic (verified OEM parts retailer)
- Amazon (ensure seller specifies genuine OEM part)
Average Cost: $100-$250 depending on your model and retailer
Step-by-Step Replacement Guide
⚠️ SAFETY FIRST
Always unplug your refrigerator from the power outlet and shut off the water supply before beginning any repair work. This prevents potential electrical shock and water damage.
Step 1: Safety Preparation
- Unplug your refrigerator from the electrical outlet.
- Locate and turn off the water supply valve that feeds the refrigerator.
- Place towels or a bucket underneath the water line connection to catch any water spillage.
Step 2: Access the Ice Maker Assembly
- Open the left French door of your refrigerator (the side with the ice dispenser).
- Locate and unlatch the ice compartment door inside the refrigerator.
- Remove the ice bin by lifting it upward and then pulling it outward and away from the compartment.
- Set the ice bin aside in a safe place where it won’t get damaged.
Step 3: Disassemble the Panel
- Locate and remove the three Phillips screws at the base of the ice compartment.
- Find and loosen (but don’t completely remove) the top screw of the panel.
- Gently pull the panel downward to expose the wiring harness behind it.
- Disconnect the wiring harness by pressing the locking tab with a flathead screwdriver and carefully unplugging it.
- Pro Tip: Take a photo of the wire connections before disconnecting to ensure proper reassembly later.
Step 4: Remove the Old Assembly
- Detach the auger coupling by unscrewing the Phillips screw that secures it and carefully slide the coupling off.
- Remove the two Phillips screws that secure the motor assembly to the refrigerator.
- Carefully flip the assembly and disconnect the ground wire.
- Free the wiring harness by gently peeling back any adhesive tape and unplugging the motor connector.
- Set aside the old assembly to make room for the new one.
⚠️ CAUTION
Handle the auger coupling with care. Forcing or misaligning it can damage the gears and potentially require additional repairs.
Step 5: Install the New Assembly
- Connect the wiring harness to the new motor assembly.
- Secure the ground wire with the Phillips screw.
- Position the new motor assembly by aligning the screw holes with the mounting points.
- Tighten the screws to secure the assembly in place, being careful not to overtighten.
- Reattach the auger coupling and secure it with the Phillips screw.
- Route the wiring harness through the designated channel and reapply adhesive tape to secure it properly.
Step 6: Reassemble and Test
- Reinstall the panel and secure it with the previously removed screws.
- Replace the ice bin in its original position.
- Latch the ice compartment door securely.
- Plug the refrigerator back in and turn the water supply back on.
- Wait 2-4 hours for the first batch of ice to be produced before testing the dispenser.
Troubleshooting After Installation
Still No Ice Production?
- Check that the water supply line isn’t kinked or frozen.
- Verify the water filter is properly installed and not clogged.
- Ensure the freezer temperature is set between 0°F and 5°F (-18°C to -15°C).
Water Leaking?
- Ensure the water inlet tube is seated properly and securely.
- Check all connections for proper alignment and tightness.
- Look for any cracks in the water line or components.
Motor Not Running?
- Verify all electrical connections are secure.
- Test the continuity of the motor with a multimeter if available.
- Check for any error codes on the refrigerator display.
When to Call a Professional
If you encounter any of these issues, consider consulting an LG-certified technician:
- Persistent error codes like “CF” that don’t resolve after replacement
- Electrical problems beyond simple connections
- Water leaks that continue despite proper installation
- Unusual noises or performance issues after installation
Cost & Time Comparison
DIY Replacement
- Part Cost: $100-$250 (OEM part)
- Time Required: 45-90 minutes
- Tools Investment: Minimal (common household tools)
- Total Cost: Cost of part only
Professional Service
- Part Cost: $100-$250 (usually marked up)
- Labor Cost: $75-$200 per hour
- Service Call Fee: $50-$100
- Total Cost: $200-$450+
Why Choose OEM Parts?
While aftermarket parts may be cheaper initially, using genuine LG OEM replacement parts (4681JA1006D, AEQ36756901, or SA12810-3850JZ2147A) offers several advantages:
- Perfect Fit: Designed specifically for your LG refrigerator model
- Reliability: Same quality and durability as the original part
- Warranty Protection: May preserve any remaining warranty coverage
- Long-Term Savings: Less likely to require premature replacement
Key Warnings & Best Practices
- Handle with Care: Avoid forcing the auger coupling—misalignment can damage gears and other components.
- Electrical Safety: Always unplug the refrigerator before starting repairs to prevent electrical shock.
- Water Damage Prevention: Turn off the water supply and have towels ready to catch any leaks.
- Connection Verification: Double-check all electrical connections and water lines before restoring power.
- Part Quality: Use OEM parts (4681JA1006D, AEQ36756901, or SA12810-3850JZ2147A) to prevent leaks or electrical issues.
Conclusion
Replacing your LG refrigerator ice maker and auger motor assembly (4681JA1006D) is a straightforward DIY project that can save you hundreds of dollars in professional repair costs. With the right tools, parts, and our step-by-step instructions, you can restore your ice maker functionality in under 90 minutes.
By following this guide, you’ve not only fixed your refrigerator but also gained valuable appliance repair skills that will serve you well in the future. Remember to always prioritize safety and use genuine OEM parts for the best results and longest-lasting repairs.
If you encounter any persistent issues after installation, don’t hesitate to consult an LG-certified technician for additional support.