Last Updated: April 24, 2025
Is your refrigerator running hot or not cooling properly? Your condenser motor might be failing. This comprehensive guide will walk you through replacing the UDQR107A1 condenser motor in Whirlpool, KitchenAid, and Maytag refrigerators, saving you hundreds in repair costs.
Understanding the UDQR107A1 Condenser Motor
What Does the Condenser Motor Do?
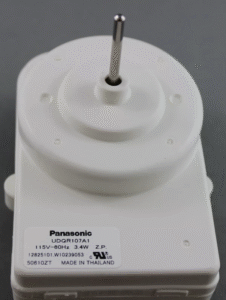
The condenser motor (UDQR107A1) plays a crucial role in your refrigerator’s cooling system. It circulates air over the condenser coils and compressor, helping dissipate heat and maintain proper cooling temperatures. When this motor fails, your entire refrigeration system is compromised.
Compatible Refrigerator Brands
The UDQR107A1 motor is compatible with several major brands:
- Whirlpool
- KitchenAid
- Maytag
- Other Whirlpool-manufactured models
Symptoms of Condenser Motor Failure
Before jumping into the replacement process, confirm that your condenser motor is indeed the problem. Here are the telltale signs of UDQR107A1 failure:
-
✓
Refrigerator not cooling below 45°F (7°C) – Despite the compressor running, temperatures stay too warm. -
✓
Unusual noises – Loud humming or vibrating sounds coming from the back or bottom of the refrigerator. -
✓
Hot condenser coils – The coils at the back or bottom of your refrigerator feel excessively hot to the touch. -
✓
Compressor running continuously – Your refrigerator never cycles off because it can’t reach the set temperature. -
✓
Food spoilage – Items in your refrigerator spoil faster than normal due to improper cooling.
⚠️Safety Warning
Always prioritize safety when working with appliances:
- Unplug the refrigerator before starting any repair work.
- Discharge the capacitor using an insulated screwdriver to short its terminals.
- Wear safety gloves and goggles to protect yourself during the repair process.
Tools & Materials Needed
Essential Tools
- ¼” nut driver
- 5/16″ socket wrench
- Flathead screwdriver (insulated handle)
- Multimeter
- Safety gloves
- Safety goggles
- Pliers
Required Parts
- OEM Motor: UDQR107A1
- Approximate Cost: $80-$200 (varies by retailer)
- Where to Buy:
- AppliancePartsPros
- Repair Clinic
- OneSourceApplianceParts.com
Step-by-Step Replacement Guide
1Unplug and Access the Condenser
Safety first! Before starting any repair work:
- Pull the refrigerator away from the wall to create adequate workspace.
- Unplug the power cord from the outlet to eliminate electrical hazards.
- If your refrigerator has a water line, shut off the water supply to prevent leaks.
- Locate the rear access panel (typically on the back of the unit near the bottom).
- Remove the panel screws using a ¼” nut driver, storing them in a safe place.
2Discharge the Capacitor
The capacitor stores electrical charge even when the unit is unplugged, making this step crucial for safety:
- Locate the capacitor near the compressor (typically a cylindrical component).
- Using an insulated screwdriver, carefully bridge the two terminals to discharge any stored energy.
- This prevents potential electric shock during the repair process.
3Remove the Old Motor
Now that you’ve safely prepared the workspace, remove the old condenser motor:
- Disconnect Wiring: Carefully unplug the motor’s wire harness by pressing the locking tab and pulling gently.
- Unbolt the Mounts: Using a 5/16″ socket wrench, remove the bracket screws securing the motor (typically located at the top, rear, and base).
- Extract the Motor: Tilt the bracket toward the compressor and slide the old motor assembly out of the refrigerator.
4Test the Old Motor
Confirm that motor failure was indeed the problem:
- Set your multimeter to resistance (Ω) mode.
- Place the probes on the motor terminals.
- A reading of infinity (∞) indicates an open circuit, while a reading of zero (0) indicates a short circuit.
- Either reading confirms motor failure, validating your diagnosis.
5Install the UDQR107A1 Motor
With the old motor removed, it’s time to install the new UDQR107A1:
- Remove the fan blade from the old motor shaft using pliers if it didn’t come off with the motor.
- Attach the fan blade to the new motor shaft, ensuring it’s securely fastened.
- Position the new motor in the bracket, aligning it with the mounting holes.
- Secure the motor with the 5/16″ screws removed earlier, tightening them evenly but not over-tightening.
- Reconnect the wire harness, listening for a click that confirms proper connection.
6Reassemble and Test
The final steps ensure everything is working properly:
- Reattach the rear access panel and secure it with screws.
- Push the refrigerator back to its original position (but not flush against the wall yet).
- Plug in the power cord and listen for the smooth operation of the new fan.
- You should hear a consistent, quiet hum without any grinding or rattling noises.
- Allow 2-4 hours for the refrigerator to reach proper cooling temperatures.
- Once cooling is confirmed, push the refrigerator back against the wall and reconnect any water lines.
💡Pro Tip
Take a picture of the wiring configuration before disconnecting anything. This simple step can save you significant time and frustration during reassembly, especially if you get interrupted during the repair process.
Troubleshooting Post-Installation
Even with a successful installation, you might encounter some issues. Here’s how to troubleshoot common post-installation problems:
If Cooling Issues Persist:
- Check the Capacitor and Relay: Use a multimeter to test for continuity in the start relay and capacitor. These components work alongside the condenser motor and might need replacement if they’ve also failed.
- Clean Condenser Coils: Dust buildup on coils can significantly reduce cooling efficiency. Use a brush or vacuum to gently remove accumulated dust and debris.
- Inspect All Wiring: Ensure no wires were damaged during the repair process and that all connections are secure.
- Verify Proper Fan Blade Operation: Make sure the fan blade rotates freely and isn’t hitting any obstacles.
When to Call a Professional:
While replacing the UDQR107A1 condenser motor is a manageable DIY project, some issues require professional attention:
- If the compressor fails to start after motor replacement
- If you notice refrigerant leaks (characterized by hissing sounds or oil spots)
- If electrical components show signs of burning or melting
- If cooling doesn’t improve after 24 hours despite a functioning condenser motor
Cost & Time Estimates
DIY Repair
- Part Cost: $80-$200 for OEM UDQR107A1 motor
- Time Investment: 1-2 hours
- Skill Level: Intermediate (basic electrical knowledge helpful)
- Tools Cost: $20-$50 if you need to purchase
- Total Cost: ~$100-$250
Professional Repair
- Service Call: $75-$150
- Labor: $75-$150
- Part Cost: $120-$250 (marked up from wholesale)
- Time: Waiting for appointment + 1 hour repair
- Total Cost: $270-$550
💰Money-Saving Insight
By replacing the UDQR107A1 condenser motor yourself, you’ll save an average of $200-$300 compared to professional service. Additionally, you’ll gain valuable repair skills and minimize food spoilage by fixing the issue promptly rather than waiting for a service appointment.
Preventative Maintenance Tips
Extend the life of your new UDQR107A1 condenser motor with these preventative maintenance practices:
- Clean Condenser Coils Quarterly: Use a coil brush or vacuum to remove dust and debris that can cause the motor to work harder than necessary.
- Ensure Proper Ventilation: Maintain at least 2 inches of clearance around your refrigerator to allow adequate airflow.
- Check for Unusual Noises: Address any new noises promptly before they lead to complete motor failure.
- Monitor Temperature Performance: Use a refrigerator thermometer to ensure temperatures remain between 35-38°F (1.7-3.3°C).
- Keep the Refrigerator Level: An unlevel refrigerator can cause excessive vibration that wears out the motor prematurely.
📌Important Reminder
Always keep the model number of your refrigerator and the part number (UDQR107A1) handy for future reference. Consider saving your receipt and warranty information for the replacement part in case issues arise later.
Frequently Asked Questions
How do I know if my refrigerator uses a UDQR107A1 condenser motor?
The UDQR107A1 is compatible with many Whirlpool, KitchenAid, and Maytag refrigerators. To confirm compatibility, check your existing motor’s part number, consult your refrigerator’s manual, or search your model number on appliance parts websites. If in doubt, a reliable parts supplier can help verify compatibility based on your refrigerator’s make and model.
Can I use a universal replacement motor instead of the UDQR107A1?
While universal replacement motors exist, they often require additional modifications to fit properly. These adjustments can include bracket adaptations, wiring changes, or fan blade modifications. For optimal performance and reliability, the OEM UDQR107A1 motor is recommended. Universal replacements might save money initially but could lead to compatibility issues, reduced performance, or shorter lifespan.
How long should a UDQR107A1 condenser motor last?
With proper maintenance, a UDQR107A1 condenser motor typically lasts 7-10 years. Factors affecting lifespan include operating conditions (ambient temperature, humidity), maintenance frequency (coil cleaning), and usage patterns. Regular cleaning of condenser coils, ensuring proper ventilation around the refrigerator, and addressing minor issues promptly can help maximize the motor’s service life.
Is replacing a refrigerator condenser motor worth it for an older refrigerator?
For refrigerators less than 10 years old, replacing the UDQR107A1 condenser motor is usually cost-effective. For older units, consider the refrigerator’s overall condition, other potential issues, and the cost of a new refrigerator. A $100-$200 motor replacement on a functional but aging refrigerator can extend its life by several years, making it economically sensible compared to the $1,000+ cost of a new unit.
Conclusion
Replacing the UDQR107A1 condenser motor is a straightforward repair that can restore your refrigerator’s cooling performance and extend its lifespan. By following this step-by-step guide, you can save hundreds of dollars in professional repair costs while gaining valuable DIY skills.
Remember these key takeaways:
- Always prioritize safety by unplugging the refrigerator and discharging the capacitor.
- Confirm motor failure through proper diagnosis before replacement.
- Use OEM parts when possible for optimal fit and performance.
- Perform regular maintenance to extend the life of your new motor.
With your newly installed UDQR107A1 condenser motor, your refrigerator should run cooler, quieter, and more efficiently—protecting your food and your wallet.