Last Updated: April 24, 2025
A comprehensive guide to safely replacing the EN60252-1 RNV 25H1205 capacitor in HVAC systems and industrial equipment. Learn the symptoms of capacitor failure, required tools, step-by-step replacement instructions, and troubleshooting tips for this critical component.
Introduction to the EN60252-1 RNV 25H1205 Capacitor
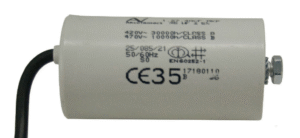
The EN60252-1 RNV 25H1205 is a specialized capacitor commonly used in HVAC systems and industrial equipment. This critical component stores electrical energy and provides the necessary boost to start and run motors efficiently. When functioning correctly, this capacitor ensures smooth motor operation and optimal system performance.
However, when the EN60252-1 capacitor starts to fail, it can lead to significant system malfunctions, reduced efficiency, and even complete equipment breakdown. Understanding how to identify, test, and replace this component is essential for maintaining your equipment and avoiding costly professional repairs.
⚠️ CRITICAL SAFETY WARNING
Capacitors store electrical energy even when the system is powered off and unplugged. This stored energy can deliver a potentially lethal electric shock. ALWAYS discharge capacitors properly before handling them. Never touch the terminals with bare hands or metal tools without proper discharge procedures.
Recognizing Signs of a Failing EN60252-1 Capacitor
Motor Symptoms
- Motor hums loudly but won’t start
- Motor starts slowly or with difficulty
- Motor overheats during operation
- Unusual motor noises or vibrations
Visible Indicators
- Bulging or distorted capacitor casing
- Leaking oil or electrolyte
- Discoloration or burn marks
- Corrosion around terminals
System Performance
- Frequent circuit breaker tripping
- AC unit blows warm air instead of cold
- Equipment runs inefficiently
- Unexplained power fluctuations
If you’re experiencing any of these symptoms, it’s likely time to check and potentially replace your EN60252-1 RNV 25H1205 capacitor. Early detection and replacement can prevent more serious damage to your equipment and extend its operational lifespan.
Essential Tools & Materials for Capacitor Replacement
Required Safety Equipment
- Insulated screwdrivers – Crucial for preventing electrical shock
- Heavy-duty electrical gloves – Provides insulation against electrical current
- Safety goggles – Protects eyes in case of capacitor rupture
- 20kΩ 5W resistor – For safely discharging the capacitor
Testing & Installation Tools
- Digital multimeter – For testing capacitance and voltage (must have capacitance measurement capability)
- Wire markers or labeling tape – To document terminal connections
- Needle-nose pliers – For handling small wires and connectors
- Smartphone camera – To photograph original wiring configuration
Replacement Part Specifications
Exact Model Required: EN60252-1 RNV 25H1205
Key Specifications: 25µF capacitance, 1205V rating, ±5% tolerance
Compatible Types: Motor start/run capacitor for HVAC and industrial applications
Where to Purchase: Trusted suppliers include Mouser, Digi-Key, and specialized HVAC parts retailers
Important Note: Always match the exact specifications of your original capacitor. Using a capacitor with incorrect voltage or capacitance ratings can damage your equipment or create safety hazards.
Comprehensive Step-by-Step Replacement Guide
Power Off and Disconnect Equipment
Safety is paramount when dealing with electrical components like the EN60252-1 capacitor.
- Turn off the main circuit breaker supplying power to the equipment
- Unplug the unit from any electrical outlets
- Use a voltage tester to confirm there is no live current in the system
- Wait at least 5 minutes for any residual power to dissipate from the system
Safely Discharge the Capacitor
Even after power disconnection, capacitors retain lethal voltage. Proper discharge is essential.
⚠️ WARNING
Never use a screwdriver to short capacitor terminals. This dangerous practice can cause sparks, damage the capacitor, and potentially cause injury.
- Attach a 20kΩ 5W resistor across the capacitor terminals
- Hold the resistor in place for at least 30 seconds to safely dissipate stored energy
- For dual capacitors, discharge between each terminal pair (C to HERM, C to FAN, and HERM to FAN)
- Use a multimeter to verify the voltage has dropped to near zero
Document Wiring Connections
Proper documentation ensures correct installation of the new capacitor.
- Photograph the current wiring setup from multiple angles
- Label each wire connected to the capacitor with its corresponding terminal (C = Common, HERM = Compressor, FAN = Blower)
- Document the color and position of each wire
- Note any special mounting arrangements or positioning
Remove the Old Capacitor
Careful removal preserves connections and mounting hardware for reuse.
- Unscrew the metal strap or bracket holding the capacitor in place
- Carefully disconnect each wire from its terminal
- If terminals are corroded, use needle-nose pliers for safer removal
- Set aside mounting hardware for reuse with the new capacitor
- Keep the old capacitor for testing and comparison with replacement
Test the Old Capacitor
Testing confirms the diagnosis and provides valuable comparison data.
- Set your multimeter to capacitance mode (usually marked with μF)
- For the EN60252-1 RNV 25H1205 model, test between terminals:
- C to HERM should read approximately 25μF
- C to FAN should match the labeled microfarad rating
- A reading that deviates by more than ±10% from 25μF indicates capacitor failure
- Also check for infinite resistance (open circuit) which indicates complete failure
Install the New RNV 25H1205 Capacitor
Precise installation ensures proper function and longevity.
- Confirm the new capacitor matches all specifications of the original (25μF, 1205V)
- Position the new capacitor in the same orientation as the old one
- Secure the capacitor with the original metal strap or bracket
- Connect each labeled wire to its corresponding terminal (C, HERM, FAN)
- Ensure connections are tight but not over-tightened
- If the original mounting hardware doesn’t fit, use a properly sized pipe hanger as an alternative
Reassemble and Test the System
Proper testing ensures the new capacitor is functioning correctly.
- Replace any covers or panels that were removed
- Restore power to the system by turning on the circuit breaker
- Set the thermostat to cooling mode (for HVAC systems)
- Listen for smooth compressor and fan startup
- Use a multimeter to verify proper voltage at capacitor terminals
- Monitor the system for 15-20 minutes to ensure stable operation
Troubleshooting Post-Replacement Issues
Motor Still Won’t Start
- Check for loose wiring connections
- Verify correct terminal connections (C, HERM, FAN)
- Inspect for additional damaged components
- Test motor windings for continuity issues
- Verify power is reaching the motor
System Runs Briefly Then Stops
- Check for thermal overload protection activation
- Verify the replacement capacitor matches OEM specifications
- Look for obstructions in air flow
- Test for short circuits in the motor
- Check for refrigerant pressure issues
Professional Assistance Indicators
Consider calling a professional technician if:
- You encounter complex wiring beyond your understanding
- Multiple components show signs of damage
- The system has advanced electronic controls
- You lack specialized tools for further troubleshooting
- The replacement capacitor doesn’t resolve the issue
Testing the New Capacitor
If issues persist after replacement, test the new capacitor to verify it’s functioning correctly:
- Disconnect and discharge the capacitor following the safety procedures outlined earlier
- Test capacitance between terminals with your multimeter
- Verify readings match the specified 25μF rating (±5% tolerance)
- Check for any physical abnormalities in the new capacitor
Cost & Time Benefits of DIY Replacement
Cost Comparison
- DIY Capacitor Cost: $15-$40 for the EN60252-1 RNV 25H1205
- Professional Service Call: $100-$300+
- Emergency After-Hours Service: $150-$500+
- Total DIY Savings: $85-$460 depending on service type
Time Analysis
- DIY Replacement Time: 30-45 minutes
- Professional Scheduling Delay: Often 1-3 days
- Equipment Downtime: Minimal with DIY
- Learning Curve: Moderate, transferable skills
Replacing the EN60252-1 RNV 25H1205 capacitor yourself not only saves you considerable money but also reduces equipment downtime. This straightforward repair gives you valuable experience with electrical components and empowers you to diagnose future issues more effectively.
Where to Purchase a Genuine EN60252-1 RNV 25H1205 Capacitor
Finding the correct replacement capacitor is crucial for a successful repair. Here are reliable sources for purchasing a genuine EN60252-1 RNV 25H1205 capacitor:
Online Electronics Suppliers
- Mouser Electronics – Large inventory of industrial capacitors
- Digi-Key – Comprehensive selection with detailed specifications
- Newark – Industrial-grade electronic components
HVAC Specialty Retailers
- Grainger – Commercial/industrial equipment supplier
- SupplyHouse.com – HVAC parts and components
- Local HVAC supply houses often stock common capacitors
What to Avoid
- Unknown marketplace sellers without return policies
- Used or refurbished capacitors (always buy new)
- Significantly cheaper options (often counterfeit)
- Generic capacitors without proper EN60252-1 certification
Verification Tips
When your capacitor arrives, verify these key specifications:
- Exact model number: EN60252-1 RNV 25H1205
- Capacitance rating: 25μF (microfarads)
- Voltage rating: 1205V
- Tolerance: ±5%
- Look for proper certification markings
- Check manufacturing date (newer is better)
Preventing Future Capacitor Failures
Extending the life of your EN60252-1 capacitor and preventing premature failures requires proactive maintenance and proper operating conditions:
Temperature Management
- Keep equipment in well-ventilated areas
- Clean air vents regularly to prevent overheating
- Install proper shade for outdoor units
- Maintain clearance around equipment per manufacturer specifications
Electrical Environment
- Install surge protectors for equipment
- Address frequent power fluctuations
- Ensure proper grounding of electrical systems
- Consider voltage stabilizers in unstable power environments
Maintenance Schedule
Implement these routine checks to catch capacitor issues early:
- Monthly: Listen for unusual motor sounds during startup
- Quarterly: Clean equipment and check for adequate airflow
- Bi-annually: Visual inspection of capacitor casing for bulging or discoloration
- Annually: Professional inspection of electrical components and connections
Pro Tip: Capacitor Lifespan
Even high-quality capacitors like the EN60252-1 RNV 25H1205 have a typical lifespan of 5-10 years depending on usage conditions. Consider proactive replacement of capacitors in critical equipment approaching the 8-year mark, especially in commercial or industrial applications where downtime is costly.
Conclusion: Mastering EN60252-1 Capacitor Replacement
Successfully replacing an EN60252-1 RNV 25H1205 capacitor is a manageable DIY task that can save you substantial time and money while extending the life of your equipment. By following the safety protocols and step-by-step instructions outlined in this guide, you can confidently diagnose and replace this critical component.
Remember that safety is paramount when working with capacitors, as they store electrical energy even when powered off. Always discharge capacitors properly, use appropriate safety gear, and verify specifications when purchasing replacements.
Regular maintenance and proper operating conditions will help prevent premature capacitor failures. By developing these electrical troubleshooting skills, you’re empowering yourself to handle future issues more effectively and economically.
Whether you’re maintaining a home HVAC system or industrial equipment, understanding the EN60252-1 capacitor’s role and replacement procedure is a valuable addition to your maintenance knowledge base.
Frequently Asked Questions
Can I replace an EN60252-1 RNV 25H1205 with a different capacitor model?
You should always replace a capacitor with the exact same model or one with identical specifications. The EN60252-1 RNV 25H1205 has specific capacitance (25μF) and voltage (1205V) ratings designed for particular equipment. Using a different model, even with similar specifications, may lead to equipment malfunction, reduced efficiency, or safety hazards. If the exact model is unavailable, consult with a professional to identify a safe and compatible alternative.
How dangerous is it to replace a capacitor without discharging it first?
Extremely dangerous. Capacitors like the EN60252-1 RNV 25H1205 can store lethal amounts of electrical energy even when disconnected from power. A fully charged 1205V capacitor can deliver a life-threatening electric shock. Always discharge capacitors properly using a resistor across the terminals before handling. Never skip this critical safety step, even if the equipment has been unplugged for days, as capacitors can hold their charge for extended periods.
What’s the typical lifespan of an EN60252-1 capacitor?
The typical lifespan of an EN60252-1 series capacitor like the RNV 25H1205 is between 5-10 years under normal operating conditions. Factors that can reduce this lifespan include high ambient temperatures, frequent power fluctuations, excessive cycling (turning equipment on and off repeatedly), and operating the equipment beyond its designed capacity. In critical applications, consider proactive replacement around the 7-8 year mark to prevent unexpected failures and system downtime.
I’ll continue with the rest of the article for your WordPress blog.
How do I know if I need to replace just the capacitor or the entire motor?
Start by replacing only the capacitor if you observe classic capacitor failure symptoms (motor humming but not starting, visible bulging of the capacitor casing, or the motor running intermittently). After replacing the capacitor, if the motor still exhibits problems such as excessive noise, vibration, burning smells, or overheating, the motor itself may be damaged. A simple test is to measure the motor windings with a multimeter – abnormal resistance readings indicate motor damage rather than capacitor issues.
Safety Tips Summary
When working with the EN60252-1 RNV 25H1205 capacitor, always keep these critical safety practices in mind:
Before Replacement
- Disconnect all power sources
- Wait at least 5 minutes for internal discharge
- Use proper insulated tools
- Wear safety gloves and eye protection
During Replacement
- Always discharge capacitor with a resistor
- Never touch terminals directly
- Avoid metal tools contacting multiple terminals
- Verify terminal identification before connections
After Replacement
- Double-check all connections
- Secure the capacitor properly
- Replace all safety covers
- Monitor initial operation for abnormalities
Remember: Capacitors Are Not DIY-Friendly Components
If you’re uncomfortable with electrical work or unfamiliar with proper safety procedures, don’t hesitate to call a professional. The cost of professional service is minimal compared to the potential risks of improper capacitor handling. Never attempt capacitor replacement if you lack proper tools or safety equipment.
Technical Specifications of the EN60252-1 RNV 25H1205
Understanding the technical specifications of the EN60252-1 RNV 25H1205 capacitor helps ensure you select the correct replacement:
Core Specifications
- Standard: EN60252-1 (European standard for motor capacitors)
- Model: RNV 25H1205
- Type: Motor run/start capacitor
- Capacitance: 25 microfarads (μF)
- Voltage Rating: 1205V
- Tolerance: ±5%
- Application: HVAC systems and industrial equipment
Physical Characteristics
- Construction: Metalized polypropylene film
- Housing: Aluminum case with safety pressure interrupter
- Terminal Type: Quick-connect/spade terminals
- Mounting: Bracket mount (specific to model)
- Operating Temperature: -40°C to +70°C
- Humidity Resistance: Up to 95% relative humidity
Standards Compliance
The EN60252-1 designation indicates this capacitor meets specific European standards for motor capacitors:
- Safety Standards: Complies with IEC 60252-1 for motor capacitors
- Environmental Standards: RoHS compliant (Restriction of Hazardous Substances)
- Quality Assurance: Manufactured under ISO 9001 certified processes
- Reliability: Designed for a minimum of 10,000 hours of operation under rated conditions
Cross-Reference Information
The EN60252-1 RNV 25H1205 may be cross-referenced with equivalent capacitors from various manufacturers. When searching for replacements, these alternative part numbers may be compatible but always verify exact specifications:
- Check manufacturer data sheets for equivalent models
- Consult equipment service manuals for approved replacement parts
- Verify with the original equipment manufacturer when possible
Key Takeaways
Replacing an EN60252-1 RNV 25H1205 capacitor is a manageable DIY project when approached with proper safety precautions and attention to detail. Remember these key points:
- Safety First: Always disconnect power and properly discharge capacitors before handling
- Exact Replacement: Match the 25μF capacitance and 1205V voltage rating precisely
- Documentation: Photo-document or label all connections before removal
- Testing: Verify both the old and new capacitor using a multimeter
- Preventive Maintenance: Consider replacement of capacitors approaching 8 years of service
- Professional Option: When in doubt, consult with a qualified technician
By following this comprehensive guide, you’ve gained valuable knowledge about diagnosing capacitor failures, safely performing replacements, and maintaining your equipment for optimal performance and longevity.
Last Updated: April 24, 2025