Is your GE dryer refusing to start? A faulty start switch might be the culprit. This comprehensive guide walks you through replacing the GE dryer push-to-start switch (model 248c1146p001/WE4M416) step by step. We’ll cover everything from recognizing the symptoms of a failing switch to troubleshooting after installation, helping you save money on costly service calls while extending your dryer’s lifespan.
Understanding Your GE Dryer Start Switch
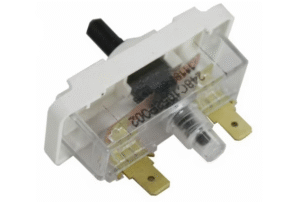
The push-to-start switch (model 248c1146p001/WE4M416) is a critical component in your GE dryer’s operation. Located in the control panel, this mechanical switch activates the dryer’s motor by closing internal electrical contacts when pressed. This seemingly simple part plays a crucial role in your appliance’s functionality.
How the Start Switch Works
When you press the start button on your dryer, you’re actually engaging a spring-loaded mechanical switch that completes an electrical circuit. This completed circuit signals the dryer’s motor to begin operating. Over time, these internal contacts can wear down, become corroded, or break entirely.
Common Signs of a Failing Switch
You might be dealing with a faulty start switch if you experience any of these symptoms:
- Complete failure to start: The dryer shows no response when the start button is pressed
- Inconsistent starting: The dryer only starts after multiple button presses
- Continuous operation: The dryer runs without stopping, even when the button isn’t being pressed
- Clicking sounds: You hear unusual clicking from the control panel area when pressing the start button
- Visible damage: The button appears damaged, stuck, or doesn’t return to position after pressing
⚠️ IMPORTANT SAFETY NOTICE
Electrical repairs can be dangerous. Always disconnect power to your dryer by unplugging it or turning off the circuit breaker before beginning work. Never attempt repairs while the appliance is connected to power. If you smell gas (for gas dryers), stop immediately, turn off the gas supply, and contact a professional.
Tools & Materials You’ll Need
Essential Tools
- Phillips screwdriver: #2 size works best for most GE dryer control panel screws
- Flathead screwdriver: Medium-sized for wire terminal connections
- Needle-nose pliers: Helpful for gripping and manipulating wires in tight spaces
- Multimeter: For testing switch continuity (digital models with continuity test mode are easiest to use)
- Towel or soft cloth: To protect both the dryer surface and control panel from scratches
- Work light or flashlight: For better visibility inside the control panel
- Small container: To hold screws and prevent them from getting lost
Required Parts
- Replacement Part: WE4M416 push-to-start switch (direct replacement for 248c1146p001)
- Compatibility: Works with numerous GE and Hotpoint dryer models including GLDP280ED0WS, GTDX100GM1WW, DBLR333EG6WW, and many others
- Quality Considerations: While aftermarket parts may be available at lower prices, OEM (Original Equipment Manufacturer) parts typically offer better reliability and longer service life
- Where to Purchase: Available through appliance parts retailers, hardware stores, or online marketplace
Preparation: Before You Begin
Locate Your Model Information
Before purchasing a replacement part, verify your dryer’s exact model number. This information is typically found on a label inside the door or on the back of the dryer. Confirming your model number ensures you get the correct replacement part.
Plan Your Workspace
Choose a well-lit area with enough space to work comfortably. If possible, move the dryer away from the wall to give yourself adequate access to the back panel. If working in a laundry closet with limited space, consider using a headlamp for better visibility.
Document Before Disassembly
Before removing any components, consider taking photos with your smartphone to document the original positions of wires and parts. These references can be invaluable during reassembly, especially if you get interrupted during the repair process.
Comprehensive Step-by-Step Replacement Instructions
Disconnect Power to the Dryer
This critical safety step cannot be overstated. Before beginning any work:
- Unplug the dryer’s power cord completely from the wall outlet
- If your dryer is hardwired, turn off the appropriate circuit breaker in your home’s electrical panel
- For gas dryers, also close the gas supply valve (typically located behind the dryer) by turning it perpendicular to the gas line
- Wait at least 5 minutes after disconnecting power before proceeding to allow any residual electrical charge to dissipate
Pro Tip: If you’re unsure which circuit breaker controls your dryer, turn on the dryer before going to the electrical panel, then shut off breakers until the dryer stops. Mark this breaker for future reference.
Access the Control Panel
To reach the start switch, you’ll need to remove the control panel:
- Pull the dryer about 6-12 inches away from the wall if possible to improve access
- Locate the three Phillips screws along the back edge of the control panel (these are typically positioned toward the top of the dryer)
- Use your Phillips screwdriver to remove these screws completely, storing them in your container
- With the screws removed, gently slide the control panel upward about ½ inch, then carefully pull it toward you
- As the panel comes free, note that it will still be connected by several wire harnesses
- Instead of disconnecting these harnesses, carefully place the panel on a towel atop the dryer’s main body
Important Note: The control panel may have sharp metal edges. Handle with care to avoid cuts. Also, the panel can scratch the top surface of your dryer, which is why placing a towel underneath is recommended.
Locate and Test the Start Switch
Before replacing the switch, confirm it’s actually the source of your problem:
- Locate the start switch on the back of the control panel – it will be directly behind the start button
- Visually inspect the switch for any signs of damage, such as melted plastic, burn marks, or broken components
- Set your multimeter to the continuity testing mode (usually indicated by a sound wave or diode symbol)
- Place one multimeter probe on each of the switch’s terminals
- With the probes in contact with the terminals, press the switch button
- A working switch should show continuity (multimeter beeps or shows near-zero resistance) only when pressed
- No continuity when pressed or continuous continuity regardless of button position indicates a faulty switch
Diagnostic Insight: Even if the switch passes the continuity test, intermittent failures are common in these components. If your dryer symptoms suggest a switch problem, replacement is still recommended as these parts are relatively inexpensive compared to service calls.
Remove the Old Switch
Step 1: Document Current Wiring Configuration
- Take a close-up photo of the switch with all wires connected
- Note the position of each wire, paying special attention to wire colors and terminal positions
- Some switches have terminal markings that can help with proper reconnection
Step 2: Detach the Wires
- Use a flathead screwdriver to carefully disconnect the black wire from the timer’s “S” terminal – this terminal is often marked with an “S” or may be identified in your dryer’s wiring diagram
- Gently disconnect the remaining wires from the switch terminals, taking care not to damage the wire connectors
- If the connectors are difficult to remove, use needle-nose pliers for a better grip
- Avoid pulling directly on the wires themselves, as this can damage the conductors inside
Step 3: Remove the Switch Mechanism
- Locate the locking tab or tabs on the switch assembly – these typically face outward from the center of the switch
- Use your flathead screwdriver to gently press this locking tab while simultaneously rotating the switch counterclockwise
- A quarter-turn (about 90 degrees) is usually sufficient to release the locking mechanism
- Once unlocked, the switch can be pulled straight out from the control panel
- Notice how the switch’s shaft aligns with the start button – you’ll need to replicate this alignment when installing the new switch
Install the New Switch
Step 1: Prepare the New Switch
- Remove the new WE4M416 switch from its packaging
- Compare it visually with the old switch to confirm it’s an identical replacement
- Check that the “D-shaped” shaft is properly aligned with the switch body
Step 2: Position the New Switch
- Align the switch’s “D-shaft” with the start button’s corresponding slot in the control panel
- The D-shape ensures proper orientation – the flat side of the “D” typically faces downward
- Insert the switch into the mounting hole, pushing it in until it’s flush with the panel
- Rotate the switch clockwise approximately 90 degrees until you hear or feel the locking tab engage
- Gently tug on the switch to verify it’s securely locked in place
Step 3: Reconnect the Wires
- Referring to your notes or photos, attach the single wire to the top terminal of the switch
- Connect the double wires to the bottom terminal of the switch
- Reattach the black wire to the timer’s “S” terminal
- Ensure all connections are tight and secure – loose connections can cause intermittent operation or sparking
- Verify that no bare wire is exposed outside the terminal connections
Wiring Tip: If you’re unsure about which terminal is “top” or “bottom,” refer to your photos or the orientation of the old switch. Most GE dryer start switches have the terminal with a single wire connection at the top and the terminal with two wire connections at the bottom when the switch is properly installed.
Reassemble the Dryer and Test
Step 1: Reassemble the Control Panel
- Carefully position the control panel back onto the dryer’s main body
- Ensure any wire harnesses are properly tucked inside and not pinched between panels
- Align the bottom tabs of the control panel with their corresponding slots on the dryer
- Slide the panel downward approximately ½ inch to engage these tabs
- Verify that the panel is sitting flush against the dryer body
- Reinsert and tighten the three Phillips screws you removed earlier
Step 2: Final Inspection
- Double-check that all screws are secure but not overtightened
- Ensure the start button moves freely and returns to its original position when pressed and released
- Verify that no tools or loose parts remain inside or on top of the dryer
Step 3: Restore Power and Test
- Plug the dryer back into the wall outlet or turn on the appropriate circuit breaker
- For gas dryers, reopen the gas supply valve by turning it parallel to the gas line
- Load a few dry towels into the dryer drum (testing with an empty drum is not recommended)
- Set the dryer to a medium heat cycle
- Press the start button to verify the dryer starts properly
- Listen for any unusual noises that might indicate problems
- Allow the dryer to run for 5-10 minutes to ensure consistent operation
Professional Testing Tip: After confirming normal operation, run the dryer through a complete cycle with a normal load to ensure there are no intermittent issues with the new switch.
Comprehensive Troubleshooting Guide
Dryer Still Won’t Start?
If your dryer still refuses to start after replacing the switch, investigate these other common failure points:
- Thermal Fuse: This safety device prevents overheating and will cut power if triggered. Located on the blower housing or exhaust duct, a blown thermal fuse shows no continuity when tested with a multimeter.
- Door Switch: Ensures the dryer operates only when the door is fully closed. Test by pressing it manually while listening for a click. A functioning switch will show continuity only when pressed.
- Timer or Electronic Control Board: Can fail and prevent the dryer from starting. These components are more complex to diagnose and might require professional testing.
- Motor: If you can hear a humming sound but the drum doesn’t turn, the motor might be failing. Motor issues typically require professional repair.
- Power Supply: Verify that the outlet is providing proper voltage (typically 240V for electric dryers). A faulty circuit breaker or outlet can prevent operation.
Experiencing Intermittent Operation?
If your dryer starts but operates inconsistently after the repair:
- Check Wire Connections: Loose or damaged wire connections can cause intermittent operation. Ensure all terminals are tight and wires show no signs of damage.
- Inspect Switch Mounting: A loosely mounted switch might not engage properly when the button is pressed. Verify the switch is securely locked in position.
- Test Button Alignment: The start button should fully depress the switch when pushed. Misalignment can cause inconsistent operation.
- Look for Moisture or Corrosion: Dampness in the control panel area can cause electrical components to function erratically. Ensure the area is completely dry.
- Monitor Voltage Fluctuations: In some homes, voltage drops during peak usage times can affect dryer operation. Consider using a voltage monitor if you suspect this issue.
When to Call a Professional
While many dryer repairs are DIY-friendly, consider contacting a qualified technician if:
- Multiple Components Fail: If you’ve replaced several parts without resolving the issue, a professional diagnostic may be more cost-effective.
- Electrical Issues Persist: Any signs of burning, melting, or electrical arcing warrant immediate professional attention.
- Gas-Related Concerns: For gas dryers, any issues involving the gas system should be addressed by certified technicians only.
- Warranty Considerations: If your dryer is still under warranty, DIY repairs might void coverage. Check your warranty terms before proceeding.
- Safety Uncertainties: If you’re uncomfortable working with electrical components or unsure about any part of the repair process, professional help is the safest option.
Preventative Maintenance Tips
Extend the life of your dryer and its components with these simple maintenance practices:
- Clean the Lint Filter: Remove lint before and after each load to improve airflow and reduce strain on electrical components.
- Check Vent Hoses: Inspect and clean the vent hose annually to prevent airflow restrictions that can lead to overheating.
- Avoid Overloading: Excessively heavy loads force the motor to work harder, potentially shortening component life.
- Listen for Changes: Unusual sounds often precede component failures. Address strange noises promptly.
- Gentle Button Operation: Avoid pressing the start button with excessive force, which can damage the switch mechanism over time.
- Keep Moisture Away: Ensure the area around your dryer stays dry to prevent corrosion of electrical contacts.
Frequently Asked Questions
How do I know if my start switch is bad?
Common signs include the dryer not starting when the button is pressed, having to press the button multiple times to start, or the dryer running continuously without stopping. A multimeter test showing no continuity when the switch is pressed confirms the switch is faulty.
How much does the GE 248c1146p001 switch cost?
The replacement switch typically costs between $15-30 depending on the retailer. This makes it an affordable DIY repair compared to service call fees that can exceed $100.
Can I replace the switch without technical experience?
Yes! This repair is considered beginner-friendly and requires only basic hand tools. If you can use a screwdriver and follow directions carefully, you can complete this repair in about 30-45 minutes.
Is the WE4M416 compatible with all GE dryers?
The WE4M416 switch is compatible with many GE and Hotpoint dryer models. To verify compatibility with your specific model, check your owner’s manual or search your model number online before purchasing.
Can a faulty start switch damage other dryer components?
Generally no, a faulty start switch primarily affects the dryer’s ability to turn on. However, if the switch causes the motor to run continuously, it could potentially lead to overheating issues that might damage other components over time.
Conclusion
Replacing a GE dryer start switch (model 248c1146p001/WE4M416) is a straightforward repair that can save you significant money compared to calling a technician. By following the six detailed steps outlined in this guide, you can restore your dryer to working condition in less than an hour.
This repair demonstrates that many common appliance issues can be resolved with basic tools and careful attention to detail. The satisfaction of fixing your own appliance, coupled with the financial savings, makes this an ideal DIY project for homeowners of all skill levels.
Remember that safety should always be your primary concern when working with any appliance. Always disconnect the power before beginning repairs, and don’t hesitate to contact a professional if you encounter any challenges beyond your comfort level.
With your newly replaced start switch, your GE dryer should provide many more years of reliable service, keeping your clothes dry and your household running smoothly.
Last Updated: April 22, 2025 – This guide contains the most current information available for replacing the GE dryer start switch model 248c1146p001/WE4M416.
Check us out for more appliance repair guides and parts at OneSourceApplianceParts.com