Last Updated: April 23, 2025
Complete step-by-step instructions to diagnose and replace your Whirlpool washer’s inlet valve. Save money with this DIY guide and get your washing machine working properly again!
Quick Summary:
A faulty water inlet valve is often the culprit when your Whirlpool washer won’t fill properly. This comprehensive guide walks you through replacing Whirlpool inlet valve models W10849297 and W11165546, compatible with numerous Whirlpool and Kenmore models. Complete this repair yourself in under an hour and save over $150 in service fees.
Introduction: Understanding Your Washer’s Inlet Valve
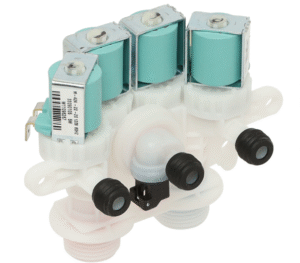
The water inlet valve is a critical component of your Whirlpool washing machine. This valve controls the flow of water into your washer, connecting directly to your home’s hot and cold water supply lines. When functioning properly, it opens during fill cycles and closes tightly when water isn’t needed.
Over time, these valves can wear out, develop mineral deposits, or suffer from electrical problems that prevent proper operation. Recognizing the symptoms early can save you from more extensive damage to your machine.
Signs Your Inlet Valve Needs Replacement:
- ✓ Washer won’t fill with water during regular cycles
- ✓ Leaking or dripping from the valve area at the back of the machine
- ✓ Low water pressure observed during fill cycles
- ✓ Washer fills partially or unevenly (hot or cold only)
- ✓ Unusual humming or buzzing during fill cycles
⚠️ SAFETY FIRST:
Always unplug your washing machine and shut off both hot and cold water supply valves before beginning any repair work. This prevents electrical shock hazards and potential water damage.
Tools & Materials Needed
Essential Tools:
- Phillips screwdriver (for panel removal)
- Adjustable wrench (for hose connections)
- Pliers (for tight connections)
- Bucket and towels (for water spillage)
- Plumber’s tape (for threaded connections)
- Putty knife (to release panel clips)
- Masking tape (for labeling connections)
Replacement Parts:
- Water inlet valve – OEM part number:
- W10849297 (older models)
- W11165546 (newer models)
- Compatible with:
- Whirlpool Cabrio washers
- Kenmore 80 Series washers
- Many Maytag and Amana models
- Optional: New inlet hoses (recommended if current hoses are over 5 years old)
Where to Buy Genuine OEM Parts:
RepairClinic
Price range: $40-75
Reliable Parts
Price range: $45-80
Whirlpool Parts
Price range: $60-100
OneSourceApplianceParts
Price range: $40-85
Step-by-Step Replacement Guide
1. Prepare the Washer
- Unplug the washer from the electrical outlet. Never work on an appliance while it’s connected to power.
- Turn off both hot and cold water supply valves typically located on the wall behind the washer.
- Pull the washer away from the wall to create enough working space (about 2-3 feet).
- Place towels on the floor to catch any water that might spill during the repair process.
2. Drain Residual Water
- Position a bucket directly under the water supply hoses at the back of the washer.
- Disconnect both hot and cold water supply hoses from the back of the washing machine using an adjustable wrench. Turn counterclockwise to loosen.
- Allow any trapped water to drain into the bucket. Some spillage is normal, which is why you placed towels down earlier.
- Set the disconnected hoses aside temporarily, making sure the open ends are pointing into the bucket to catch any remaining drips.
3. Access the Inlet Valve
Note: The exact access method may vary slightly depending on your specific Whirlpool model. Most follow this general pattern:
- Remove the screws securing the rear top panel using a Phillips screwdriver. There are typically 2-4 screws.
- For models with a hinged control panel, you may need to slide a putty knife under the sides of the control panel to release the clips that hold it in place.
- Carefully flip the control panel back or set it aside, making sure not to disconnect any wiring unnecessarily.
- Locate the water inlet valve, which is typically positioned at the upper back of the washer where the water hoses connect.
Pro Tip: Take a photo of the valve assembly with your smartphone before disconnecting anything. This will serve as a valuable reference during reassembly.
4. Disconnect the Old Valve
- Label all electrical connections using masking tape before disconnecting. Mark which wire connects to which terminal to avoid confusion during reassembly.
- Carefully disconnect the electrical connectors from the solenoids on the valve. Most connectors have a small tab that needs to be pressed to release them.
- Remove the mounting screws that secure the valve to the washer frame. There are typically 2-3 screws.
- If there are any remaining internal hose connections, loosen the clamps and disconnect these hoses from the valve.
- Carefully remove the old valve from the washer, taking note of its orientation.
Important: The inlet valve has separate solenoids for hot and cold water. Make sure you know which is which before complete disassembly.
5. Install the New Valve
- Inspect the new valve (W10849297 or W11165546) and compare it to the old one to ensure it’s the correct replacement.
- Apply plumber’s tape to the threaded connections on the new valve. This helps create a watertight seal and prevents future leaks.
- Position the new valve in the same orientation as the old one.
- Secure the valve with the mounting screws you removed earlier.
- Connect any internal hoses to the valve and secure them with their clamps.
- Reconnect the electrical connections according to your labels or reference photo. Ensure each connector clicks into place.
Troubleshooting Tip: If connectors don’t easily fit onto the terminals, double-check that you have the correct replacement valve. Never force connections.
6. Reassemble and Test
- Reattach the external hot and cold water supply hoses to the inlet valve. Hand-tighten first, then use a wrench for a final quarter-turn. Don’t overtighten as this can damage the threads.
- Reposition the control panel if you moved it, ensuring all clips engage properly.
- Reinstall the rear panel and secure it with the screws you removed earlier.
- Push the washer back to its normal position against the wall, being careful not to kink the water hoses.
- Turn on both water supply valves and check for any leaks at the connections.
- Plug the washer back into the electrical outlet.
- Run a test cycle using a small amount of water to verify proper filling and operation.
Success Check: Your washer should now fill normally with both hot and cold water. The valve should activate promptly when the cycle begins and shut off completely when the proper water level is reached.
Key Maintenance Tips
- Replace inlet hoses every 5 years, even if they appear to be in good condition. Rubber deteriorates over time, increasing the risk of catastrophic failures.
- Clean clogged inlet valve screens annually to prevent debris buildup:
- Disconnect the hoses from the valve
- Use needle-nose pliers to carefully extract the small mesh screens
- Clean with a toothbrush and soapy water to remove mineral deposits
- Rinse thoroughly and reinstall
- Install flood prevention devices like washing machine flood stops for extra protection against leaks.
- Check hose connections periodically for signs of leaking or corrosion.
Troubleshooting Post-Installation
Washer Still Won’t Fill
- Check for kinked hoses – Ensure both supply hoses are straight without bends or kinks.
- Verify water supply – Confirm both faucets are fully turned on.
- Inspect inlet screens – Clean or replace clogged inlet screens that may restrict water flow.
- Test electrical connections – Ensure all wiring is properly connected to the valve solenoids.
Leaks After Installation
- Tighten connections – Check all hose connections and tighten if necessary.
- Reapply plumber’s tape – Add fresh tape to any leaking threaded connections.
- Inspect hoses – Look for cracks or damage that might require hose replacement.
- Check valve mounting – Ensure the valve is properly secured to the washer frame.
When to Call a Professional
While this repair is DIY-friendly, consider contacting a professional appliance technician if:
- Leaks persist despite multiple attempts to seal connections
- Electrical issues arise, such as circuit breakers tripping when the washer tries to fill
- The washer shows error codes that aren’t resolved by the valve replacement
- You discover additional damaged components during the repair process
Cost & Time Estimates
DIY Repair
- Part Cost: $40-$100 (OEM part)
- Tools: $0-$30 (if you need to purchase)
- Time Required: 30-60 minutes
- Skill Level: Beginner to Intermediate
- Total Cost: $40-$130
Professional Repair
- Part Cost: $60-$120 (marked up)
- Labor: $80-$150 (1-1.5 hour service call)
- Service Fee: $50-$100 (diagnostic/travel fee)
- Time to Schedule: 1-7 days waiting
- Total Cost: $190-$370
Your Savings: $90-$290 by DIY!
Plus, you’ll gain valuable repair skills and avoid the inconvenience of waiting for a service appointment.
Frequently Asked Questions
Conclusion
Replacing a Whirlpool inlet water valve (W10849297 or W11165546) is a straightforward DIY repair that can save you significant money compared to professional service. By following the step-by-step instructions in this guide, you can restore your washing machine’s proper filling function in under an hour.
Remember that proper maintenance, including regular cleaning of inlet screens and timely replacement of aging water hoses, can prevent many common washer problems before they start. Taking these preventive measures extends the life of your appliance and helps avoid costly water damage to your home.
For this and other appliance parts, installation guides, and maintenance tips, trust the experts who understand your repair needs.
Last Updated: April 23, 2025 | Author: OneSourceApplianceParts Team