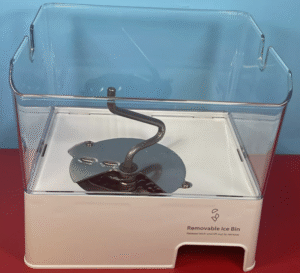
What is the W10347100 Ice Bin?
This ice bin features a durable plastic construction designed to withstand freezing temperatures while remaining easy to remove and clean. Its specialized design includes an integrated auger system that helps move ice toward the dispenser chute when activated.
Compatible Whirlpool Refrigerator Models
- Whirlpool WRF767SDHZ02
- Most side-by-side models with external dispensers
- Many French door refrigerator models
This part also serves as a replacement for these alternative part numbers:
- W10347093
- 2311097
- AP6020018
- EAP11753329
- PS11753329
Always verify compatibility with your specific refrigerator model before purchasing to ensure a proper fit.
Tools Needed for Replacement
No Tools Required!
One of the biggest advantages of replacing the W10347100 ice bin is that it requires absolutely no tools. This makes it an accessible DIY project for anyone, regardless of technical skill.
Optional Items:
- Microfiber cloth (for cleaning the ice chute and bin area)
- Warm water (if you need to melt any stuck ice)
- Plastic utensil (if ice has clumped together and needs breaking apart)
Step-by-Step Replacement Guide
Step 1: Open the Freezer Door and Locate the Ice Bin
Step 2: Release and Remove the Ice Bin
- Open the ice bucket cover by pressing the locking tab up
- Insert your fingers into the opening
- Pull the latch toward you (located in the lower right corner of the ice bucket)
- While holding the latch, lift the bin upward
The ice bin should release and come out smoothly. If you encounter resistance, don’t force it as this could damage the bin or the latch mechanism.
Step 3: Empty and Clean the Old Ice Bin (If Reusing)
- Empty all ice into a sink or container
- Rinse the bin with warm water and mild soap
- Thoroughly dry the bin before reinstalling it to prevent new ice from sticking
Step 4: Align and Install the New W10347100 Bin
- Align the bin properly in the opening
- Set it in place, lowering it onto the support mechanism
- Press down firmly until you hear an audible click, indicating the bin is locked in place
The bin should sit flush and secure when properly installed.
Common Troubleshooting Issues
Ice Bin Won’t Release
- Check if ice has frozen the bin in place. If so, allow it to thaw slightly before attempting removal again
- Ensure you’re pressing the release tab completely
- In severe cases where the bin appears stuck due to rust or other mechanical issues, you might need to use a hook-shaped tool to manually push the release rod
Bin Won’t Seat Properly
- Check for ice buildup in the mounting area and clear if present
- Verify the bin is properly aligned before attempting to click it into place
- Ensure the latch mechanism is functioning correctly
Ice Not Dispensing After Replacement
- Make sure the bin is seated completely with an audible click
- Check if ice has clumped together in the bin
- Verify the auger (the spiral mechanism that moves ice) is properly aligned and functioning
- Ensure the dispenser paddle is fully engaging when pressed
Maintenance Tips for Your W10347100 Ice Bin
Regular Cleaning Schedule
- Empty and clean the ice bin every 2-4 weeks
- Wipe down the ice chute and dispenser area with a warm, damp cloth
- Use a mixture of water and vinegar (1:1 ratio) for deeper cleaning to prevent mold and bacteria growth
Preventing Ice Clumping
- Avoid opening the freezer door unnecessarily, as humidity increases clumping
- Don’t overfill the ice bin, which can put pressure on the ice and cause clumping
- If ice has clumped together, empty the bin and break up the ice using a plastic utensil (never use sharp objects)
Post-Installation Care
- Consider discarding the first few batches of ice to ensure the system is clean
- Run a few cycles to ensure everything is functioning properly
- Monitor the bin for any unusual noises during operation
Frequently Asked Questions
How often should I clean my W10347100 ice bin?
For optimal performance and hygiene, clean your ice bin every 2-4 weeks, more frequently if you notice ice quality issues or reduced production.
Why is my ice maker making ice but not dispensing it?
This could be due to ice clumping in the bin, a misaligned bin, or issues with the auger mechanism. Try removing and reinstalling the bin, and check for ice clumps blocking the dispenser chute.
Can I use hot water to clean the ice bin?
Warm water is recommended, not hot. Extreme temperature changes can potentially damage plastic components. Always ensure the bin is completely dry before reinstalling.
My ice has a strange taste or odor. What should I do?
Empty the bin completely, clean thoroughly with a vinegar/water solution, rinse well, and dry. Also consider replacing your refrigerator’s water filter if it’s been more than 6 months.
Can I use a generic ice bin instead of the W10347100?
While generic bins may fit, the W10347100 is specifically designed for Whirlpool refrigerators and ensures proper functioning with the dispenser mechanism. OEM parts typically provide better fit and reliability.
Why does my ice bin crack?
Ice bins can become brittle and crack due to constant exposure to freezing temperatures, physical stress from removing and replacing the bin, or impact damage when emptying ice. The W10347100 is designed with durable materials to minimize this issue.
Safety Considerations
- If you need to clean around electrical components, unplug the refrigerator first
- When breaking up ice clumps, use only plastic utensils to avoid damaging the bin
- Always ensure the bin is properly seated to prevent operational issues
- Keep fingers clear of moving parts such as the auger when installing or removing the bin
- Allow the bin to reach room temperature before cleaning with warm water to prevent thermal shock
Conclusion: Keep Your Ice Flowing with the W10347100
Remember these key points:
- The W10347100 is compatible with many Whirlpool side-by-side and French door refrigerator models
- No tools are required for removal or installation
- Regular cleaning every 2-4 weeks helps maintain ice quality and dispenser function
- Proper installation is confirmed by an audible click when the bin locks into place
By following the steps outlined in this guide, you’ll ensure your Whirlpool refrigerator’s ice dispensing system operates flawlessly for years to come.
Last Updated: April 21, 2025
Check us out for more at OneSourceApplianceParts.com