Is your Whirlpool washer displaying error codes, refusing to start, or showing unresponsive controls? The W10303820 control board is likely the culprit. This premium guide walks you through identifying, purchasing, and replacing your Whirlpool washer’s main control board with professional-level instructions.
By tackling this repair yourself, you’ll save $150-300 in service fees while gaining valuable DIY skills. Follow our expert guidance to restore your washer to perfect working condition in under two hours.
Quick Navigation
Part Identification & Compatibility
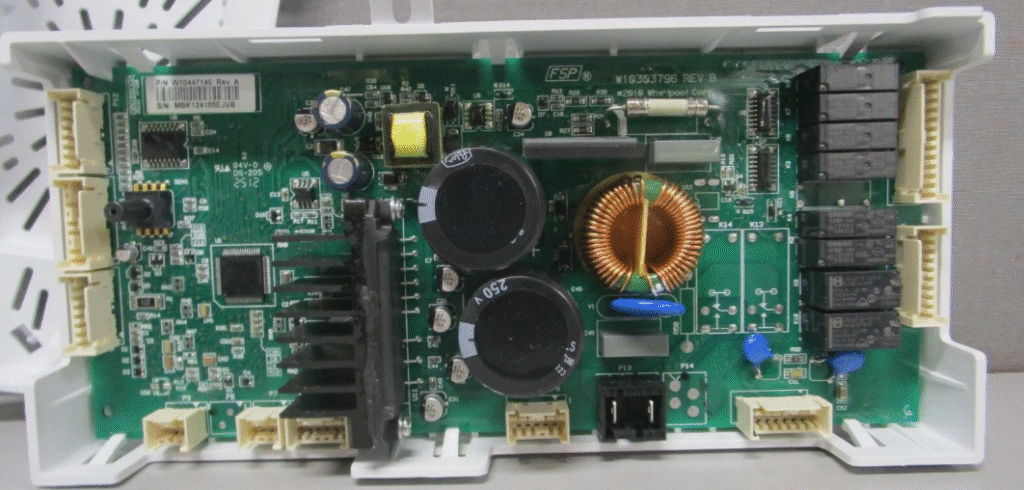
Control Board W10303820: What It Looks Like
The W10303820 control board has several distinguishing features that set it apart from other Whirlpool control boards:
- Larger footprint compared to newer models
- Distinctive metal heat sinks for thermal management
- Typically features 5-7 connector ports for various washer functions
- Green circuit board with white component labels
Pro Tip: Always verify your existing board’s part number before ordering a replacement. It’s usually printed directly on the circuit board or on a label attached to it.
W10303820 Compatibility List
| Compatible Models | Years Manufactured | Verification Method |
|---|---|---|
| Whirlpool LXR9245EQ | 2015-2018 | Model tag inside door |
| Maytag MVWX600AW | 2016-2019 | Model tag on rear panel |
| Whirlpool WTW4800XQ | 2014-2017 | Model tag under lid |
| Whirlpool WTW5500XW | 2015-2018 | Model tag on rear panel |
Critical Warning: Control boards are NOT interchangeable between different washer models. Using the incorrect board can permanently damage your washer and void any warranty. Always verify exact part number compatibility with your model number.
Other Common Whirlpool Control Boards
W10394233
- Rectangular shape
- 6 wire connectors
- Often labeled with “WPW” prefix
- Compatible with: Whirlpool WFW92HEFU, WFW8620HW
W10447146
- Square design
- 4 connectors
- Green LED indicator
- Compatible with: WTW5000DW, WTW4816FW
W10763748
- Kenmore-compatible
- White housing
- 8-pin ribbon cable
- Compatible with: Kenmore 110.27063, 110.28052
Symptoms of Control Board Failure
Your Whirlpool washer may be suffering from a faulty W10303820 control board if you notice any of these symptoms:
- Washer completely unresponsive (no lights, no response to buttons)
- Washer won’t start, drain, or spin cycles
- Error codes displaying on control panel (F5E1, F7E3 are common)
- Cycles start but stop mid-operation
- Control panel buttons work intermittently
- Display shows random characters or is partially lit
- Burning smell coming from control panel area
Safety Precautions
CRITICAL SAFETY STEPS BEFORE BEGINNING:
- Unplug the washer from the wall outlet completely
- Wait at least 30 minutes for internal capacitors to discharge
- Remove all jewelry (rings, watches, bracelets) that might conduct electricity
- Use an insulated screwdriver if you need to discharge capacitors manually
- Wear rubber-soled shoes when performing the repair
Even when unplugged, capacitors in the washer can hold an electrical charge. For the W10303820 control board specifically, these capacitors may retain charge for up to 30 minutes after disconnecting power.
If you’re uncomfortable working with electrical components, consider hiring a professional technician for this repair.
Tools & Materials Needed
Replacement Parts
| Part Number | OEM Price Range | Refurbished Price Range | Recommended Source |
|---|---|---|---|
| W10303820 (Focus of this guide) | $240-270 | $160-190 | Appliance Parts Pros |
| W10394233 (Alternative model) | $220-250 | $130-150 | Repair Clinic |
Required Tools
Basic Tools
- Phillips screwdriver (sizes #1 and #2)
- Needle-nose pliers
- Flashlight or work light
- Masking tape and marker (for labeling wires)
Specialized Tools
- Multimeter (for testing power supply)
- Anti-static wrist strap
- Insulated screwdriver (for capacitor discharge)
- Small container (for organizing screws)
Step-by-Step Replacement Guide for W10303820
Access the Control Board
For models using the W10303820 control board:
- For top-load models: Locate and remove the two screws at the back of the control panel. Then carefully slide a putty knife under the control panel to release the retention clips.
- For front-load models: Remove the top panel by inserting a flat tool (putty knife or flat screwdriver) into the seam at the front corners and gently lifting to release the clips.
Once you’ve gained access, locate the main control board. For the W10303820, it’s typically housed in a plastic enclosure inside the control panel assembly.
Document & Disconnect Wiring
Before removing any wires:
- Take a clear photo of the current wiring configuration with your smartphone
- Label each wire harness with masking tape and a marker (e.g., “P1,” “P2,” etc.)
- Disconnect one wire at a time by pressing the locking tabs on the harnesses and gently pulling
- Be especially careful with ribbon cables, which are more delicate than standard wire harnesses
Pro Tip: Never pull directly on the wires themselves, only on the plastic connector housings. Pulling on wires can damage connections and lead to further problems.
Remove the Old Board
- Locate the 4 mounting screws securing the W10303820 board to the control panel housing
- Carefully remove these screws and set them aside in your parts container
- Note the orientation of the board before removing it completely
- Gently lift the board straight out to avoid bending any pins or components
- Place the old board on a non-conductive surface
Examine the old board for any visible damage like burnt components, bulging capacitors, or corrosion, which can help confirm your diagnosis.
Install the New W10303820 Board
- Remove the new W10303820 control board from its packaging
- Handle it only by the edges to prevent static damage
- Align the new board with the screw holes in the control panel housing
- Insert and tighten the 4 mounting screws, being careful not to overtighten
- Reconnect all wiring harnesses according to your labels and photo reference
- Ensure each connector clicks securely into place
- Double-check that any ribbon cables are fully inserted and secured
Reassemble and Test
- Snap the control panel back into place (or reattach with screws, depending on your model)
- Ensure all clips engage properly and the panel sits flush
- Plug in the washer and wait 30 seconds for the control board to initialize
- Run a calibration cycle (usually done by pressing a specific button combination—check your washer’s manual)
- Test all washer functions, including each cycle setting
Success Indicator: A properly installed W10303820 control board will result in a washer that powers up normally, responds to all controls, and completes cycles without error codes. Listen for normal clicking sounds as the control board activates various washer functions.
Troubleshooting Post-Installation
If Your Washer Is Still Not Working:
Washer Completely Dead
- Check your home’s circuit breaker
- Verify the 15A internal fuse on the control board
- Test the power outlet with another appliance
- Inspect the power cord for damage
Error Codes Still Appearing
- Reset the washer by unplugging it for one full minute
- Check door latch assembly (common issue with front-loaders)
- Verify all wire connections are secure
- Test water inlet valves for continuity
Partial Functionality
- Some functions work but others don’t? This usually indicates a connection issue
- Re-check all wire harness connections
- Examine the user interface cable for proper connection
- Test individual components (motor, pump, valves)
Where to Buy the W10303820 Control Board
OEM Parts
Original Equipment Manufacturer boards offer reliability and warranty coverage.
- Whirlpool Parts Direct: $240-270
- Sears Parts Direct: $250-280
- Appliance Parts Pros: $240-260
Pros: Factory quality, full warranty
Cons: Higher cost
Refurbished Parts
Professionally reconditioned boards offer a balance of reliability and savings.
- Appliance Part Doctor: $160-190
- Repair Clinic: $180-200
- eBay (certified sellers): $150-180
Pros: Lower cost, still reliable
Cons: Shorter warranty periods
Beware of Counterfeits: The market for W10303820 boards has seen numerous counterfeits. To avoid fakes, purchase only from authorized resellers, check for authentic Whirlpool packaging, and verify the board has proper labeling and QC stickers.
Preventative Maintenance Tips
Extend the life of your new W10303820 control board with these maintenance practices:
Moisture Protection
- Keep detergent and fabric softener from spilling on the control panel
- Wipe up any spills immediately with a dry cloth
- Keep washer lid/door closed when not in use to prevent humidity damage
Electrical Protection
- Install a dedicated surge protector for your washer
- Unplug during electrical storms
- Avoid using extension cords or multi-outlet adapters
Temperature Management
- Clean dust from vents every 6 months
- Ensure proper ventilation around the washer
- Avoid operating in extremely hot environments
Frequently Asked Questions
No, Whirlpool washer control boards are not interchangeable. Using a mismatched board (even one with a similar appearance or from a similar model) can damage your washer and potentially create safety hazards. The W10303820 board is specifically designed for particular Whirlpool models, and substituting it with a different part number will likely result in communication errors between components.
While technically possible, repairing a W10303820 control board requires specialized equipment and advanced electronics knowledge. Common failures involve surface-mount components, microcontrollers, or damaged traces that are extremely difficult to repair without professional tools. For most homeowners, replacement is more cost-effective and reliable than attempting repairs.
A W10303820 control board typically lasts 7-10 years under normal usage conditions. Factors that can reduce lifespan include power surges, exposure to moisture or extreme temperatures, and heavy usage patterns. OEM boards generally last longer than aftermarket alternatives. With proper care and maintenance, your replacement board should provide years of reliable service.
For washers less than 7-8 years old, replacing the W10303820 control board is usually cost-effective. The replacement costs approximately $160-270 while a new comparable washer starts at $600-800. However, if your washer has multiple issues beyond the control board or is over 10 years old, replacement might be more economical in the long run. Consider the washer’s overall condition, age, and the availability of other parts before investing in a control board replacement.
When to Call a Professional
While replacing a W10303820 control board is achievable for many DIYers, certain situations warrant professional help:
- If you notice frayed wiring or damaged connectors
- When capacitors appear swollen or leaking
- If burning smells persist after board replacement
- When multiple components have failed simultaneously
- If you’re uncomfortable working with electrical components
A professional technician will have the tools and expertise to diagnose complex issues beyond a simple board failure.
Conclusion
Replacing your Whirlpool washer’s W10303820 control board is a manageable DIY project that can save you significant repair costs. By following this comprehensive guide, you now understand how to identify a failing control board, safely remove the old one, properly install the replacement, and troubleshoot any post-installation issues.
Remember to always prioritize safety, purchase the correct part number for your specific model, and take your time during the installation process. With the right precautions and attention to detail, your Whirlpool washer should return to full functionality and serve you reliably for years to come.
Check us out for more at OneSourceApplianceParts.com